

Salesforce
Salesforce Integration Guide
Integration Guide
- Environment - Select your Salesforce environment, Production or Test (Sandbox). Default is Production.
- Authentication Type - Select Client Credentials if you want to control the scope of API access, otherwise select OAuth.
With OAuth, no further setup is required - you'll be redirected to Salesforce to log in and authorize access.
With Client Credentials, follow the steps below.
Client Credentials
Depending on your org, this is set up using either a Connected App (managed via App Manager) or the newer External Client App (managed via External Client App Manager) - some orgs show only one, some show both. See Salesforce's Connected Apps and External Client Apps features comparison if you're not sure which one to use. Salesforce is steering new integrations toward External Client Apps - notably, External Client Apps don't need the extra app-authorization permission set that Connected Apps require (see Step 3 below), which makes them the simpler option when your org has both available.
Steps 1 and 2 below are identical either way. Step 3 (creating and configuring the app) is where the two diverge - Connected Apps need an extra permission-set workaround and have a confusing duplicate "Run As" field, neither of which apply to External Client Apps. Step 4 is shared again.
Step 1: Create an Integration User
Salesforce recommends using a dedicated Integration User to run the Client Credentials Flow, instead of a regular user, so the integration's access can be scoped and audited independently.
-
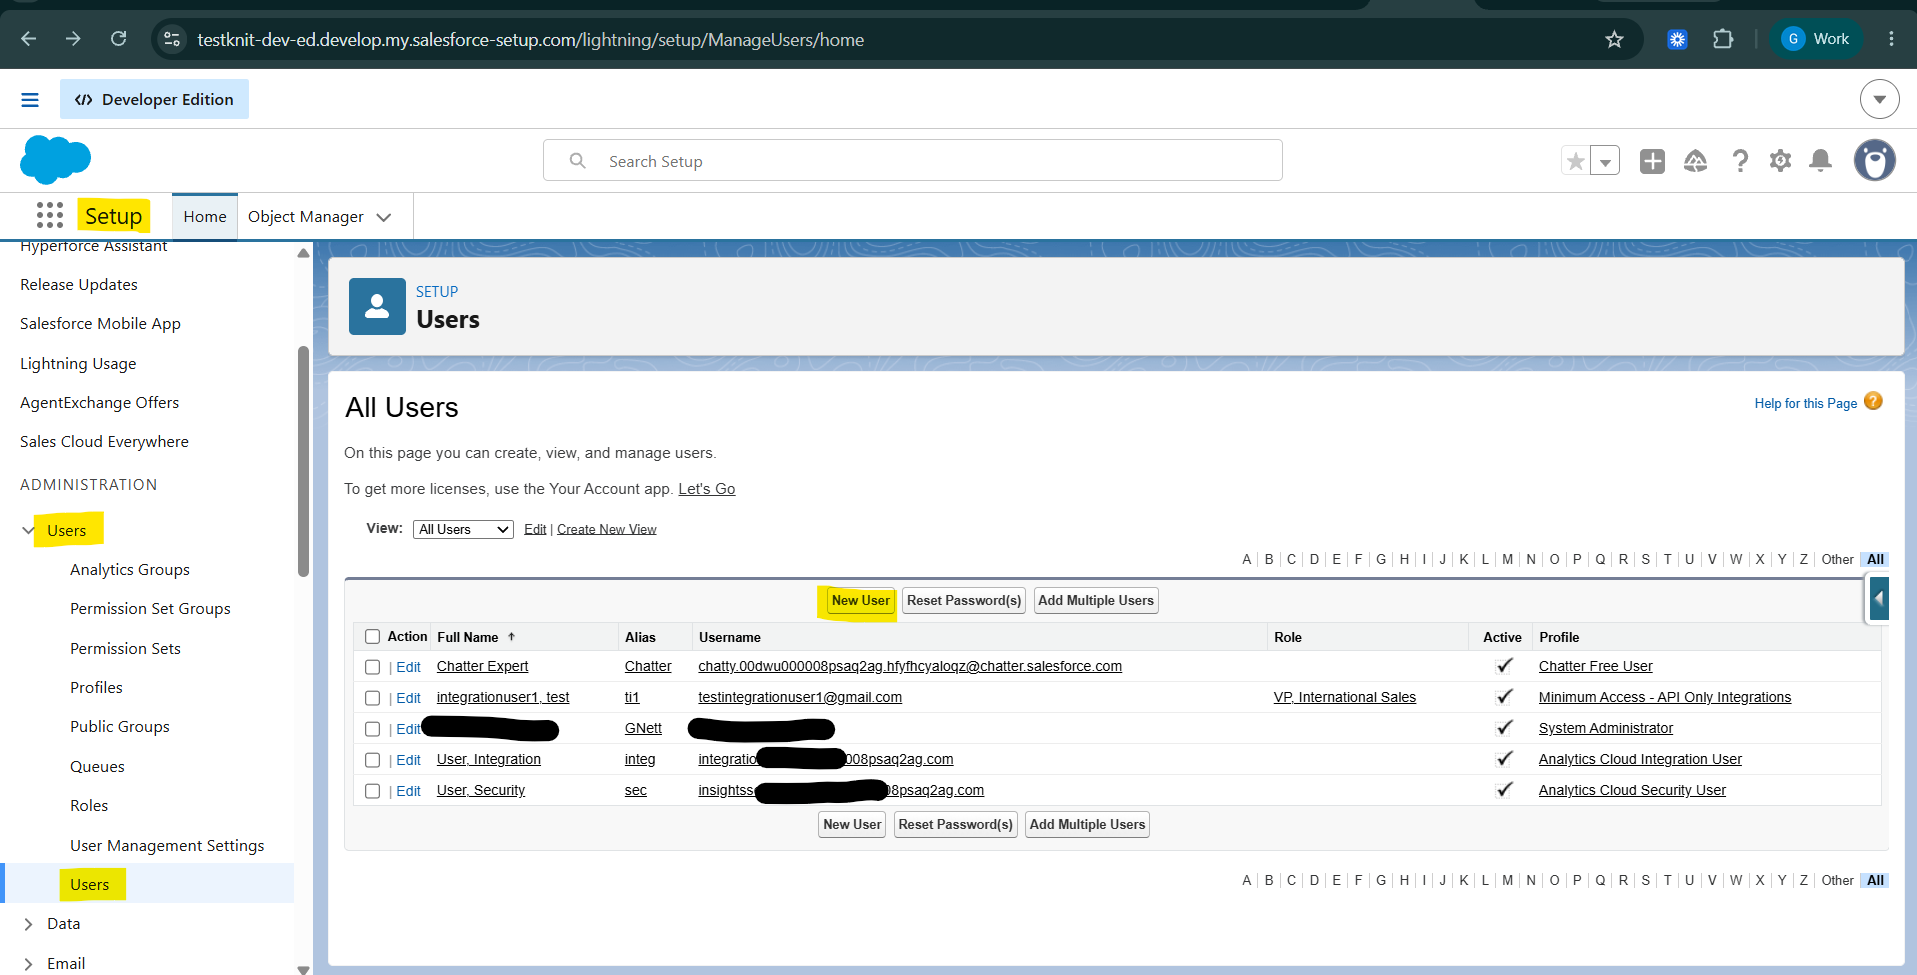
Go to Setup > Users > New User.
-
Fill in the Name, a reachable Email (Salesforce sends a verification email here, though this flow never actually requires the password), and a Username (must be email-formatted and globally unique, but doesn't need to be a real address).
-
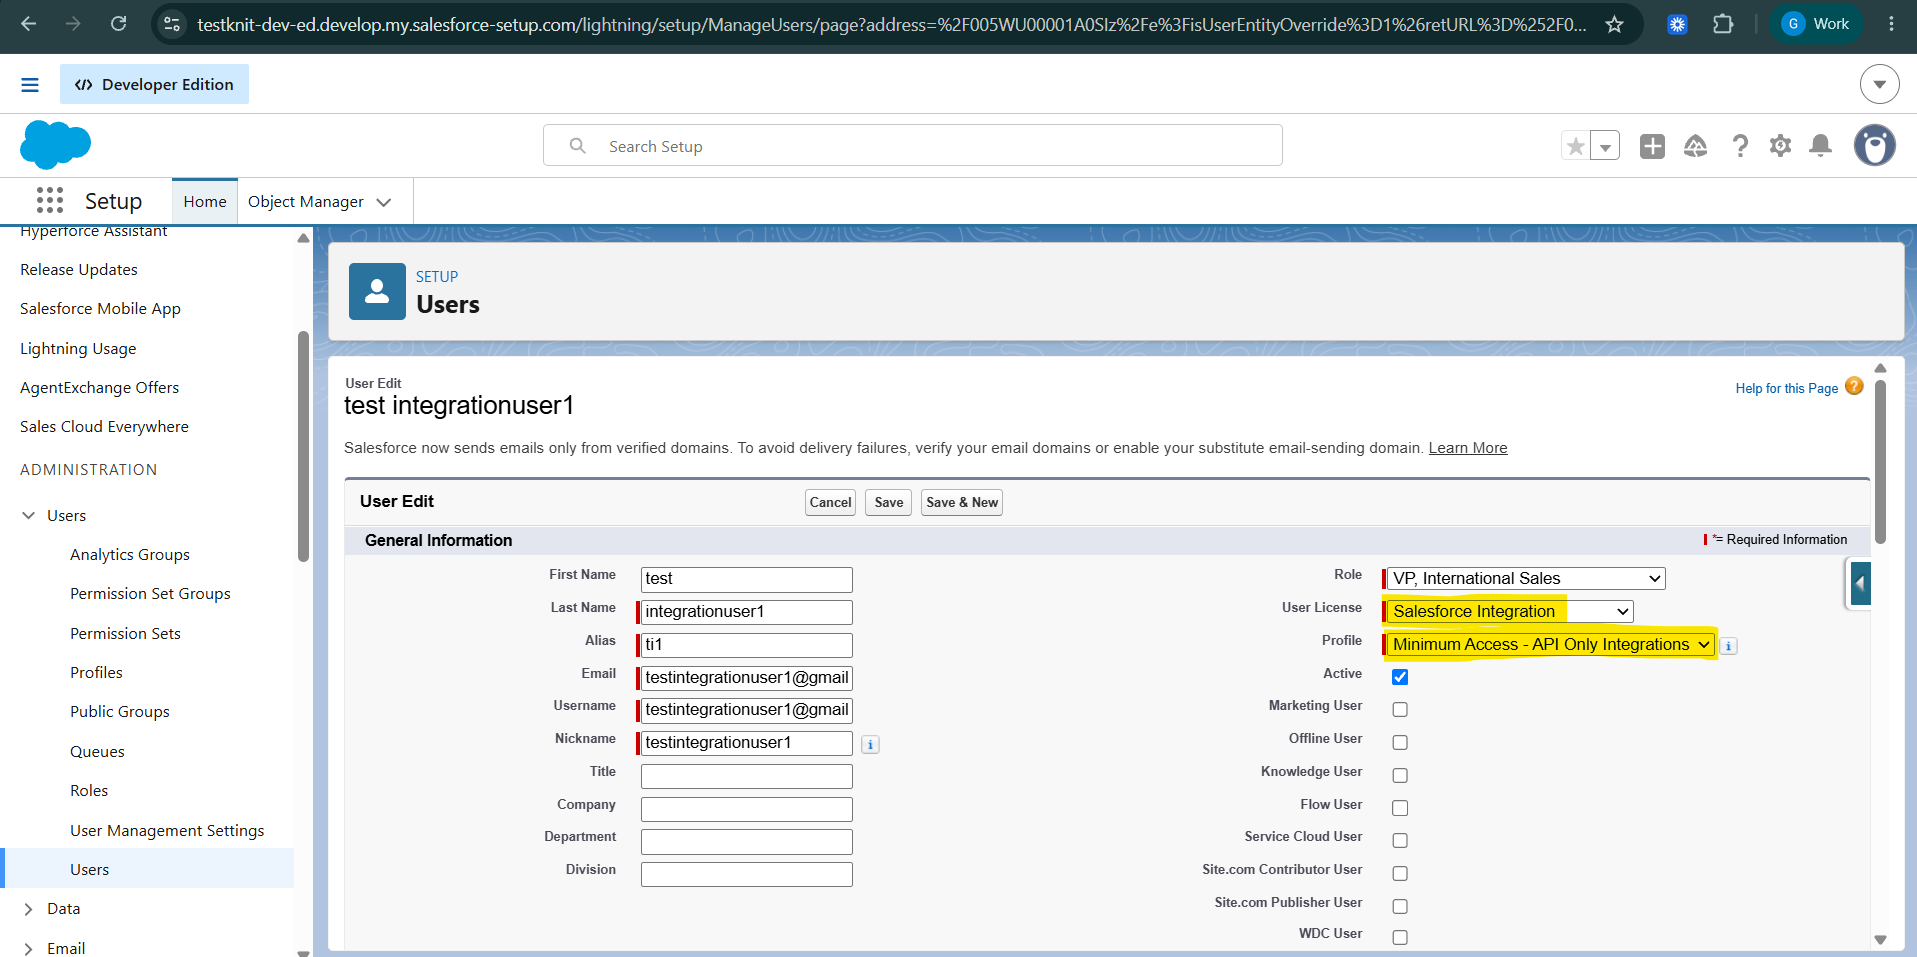
Set User License to Salesforce Integration.
-
Set Profile to Minimum Access - API Only Integrations (older orgs may only show Salesforce API Only System Integrations - that also works).
-
Click Save.
Step 2: Create a Permission Set (data access)
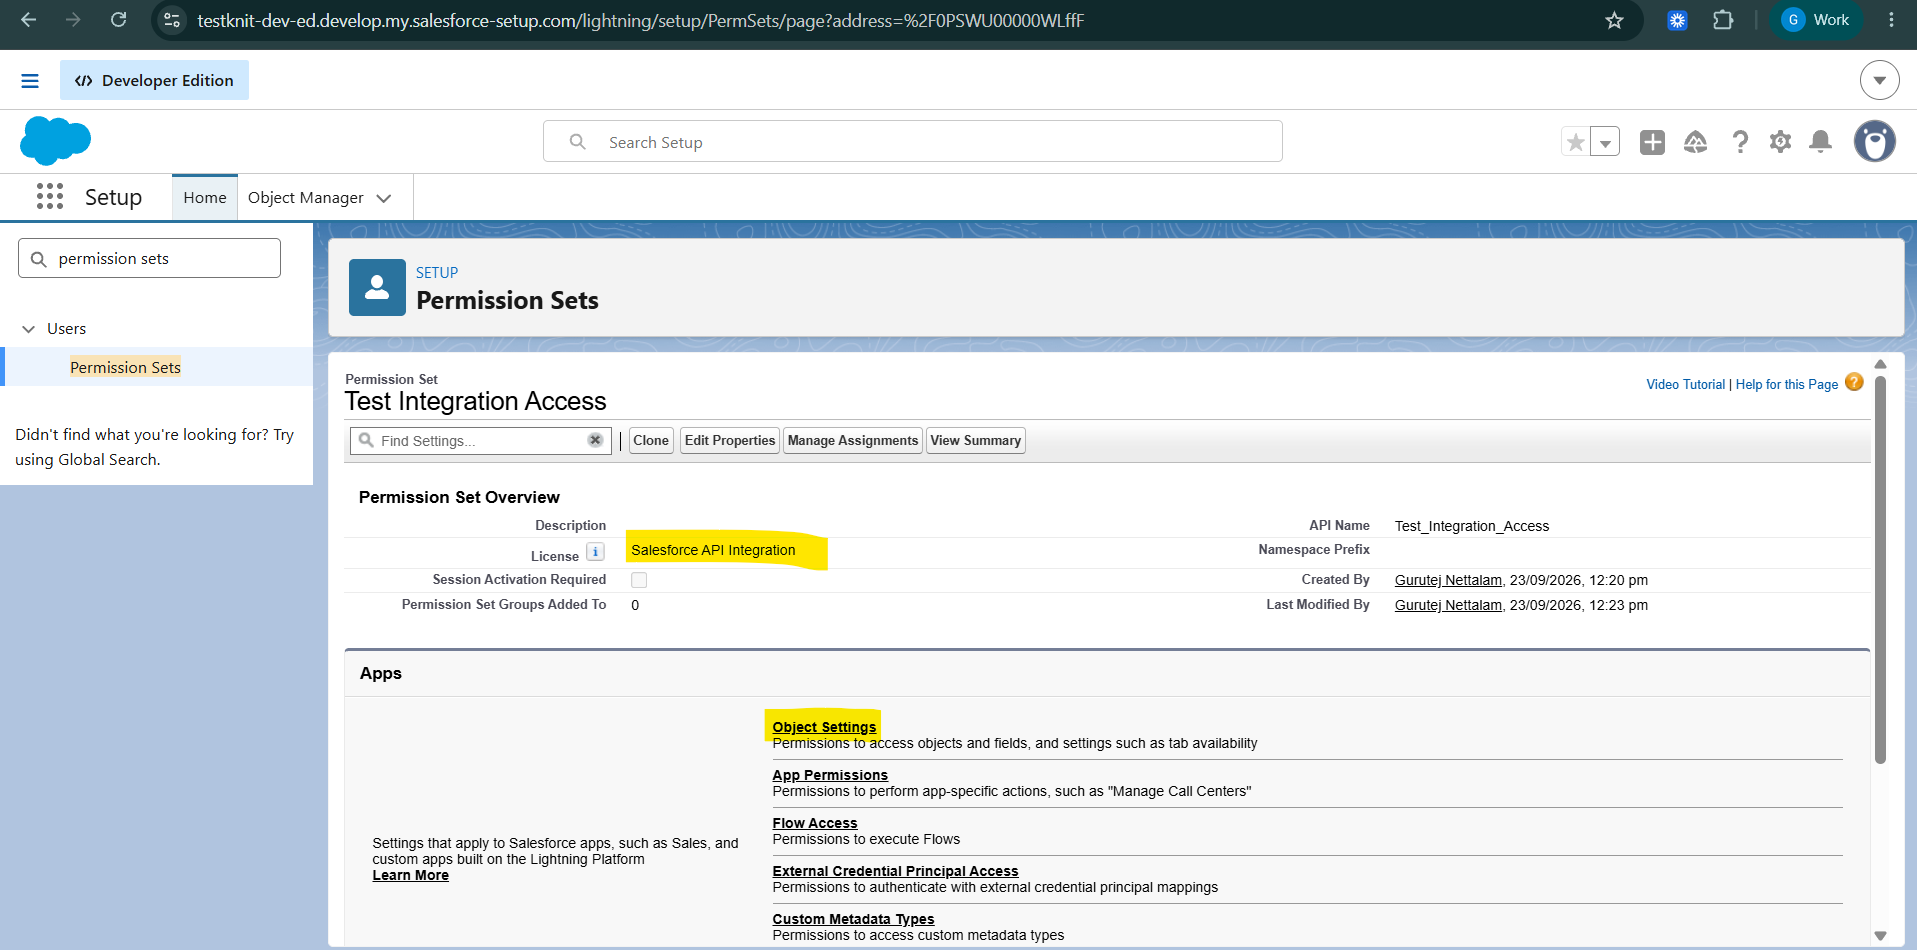
Access for the integration is granted through a dedicated permission set, not the user's profile. This is the permission set that controls which Salesforce objects and fields the integration can actually read/write.
-
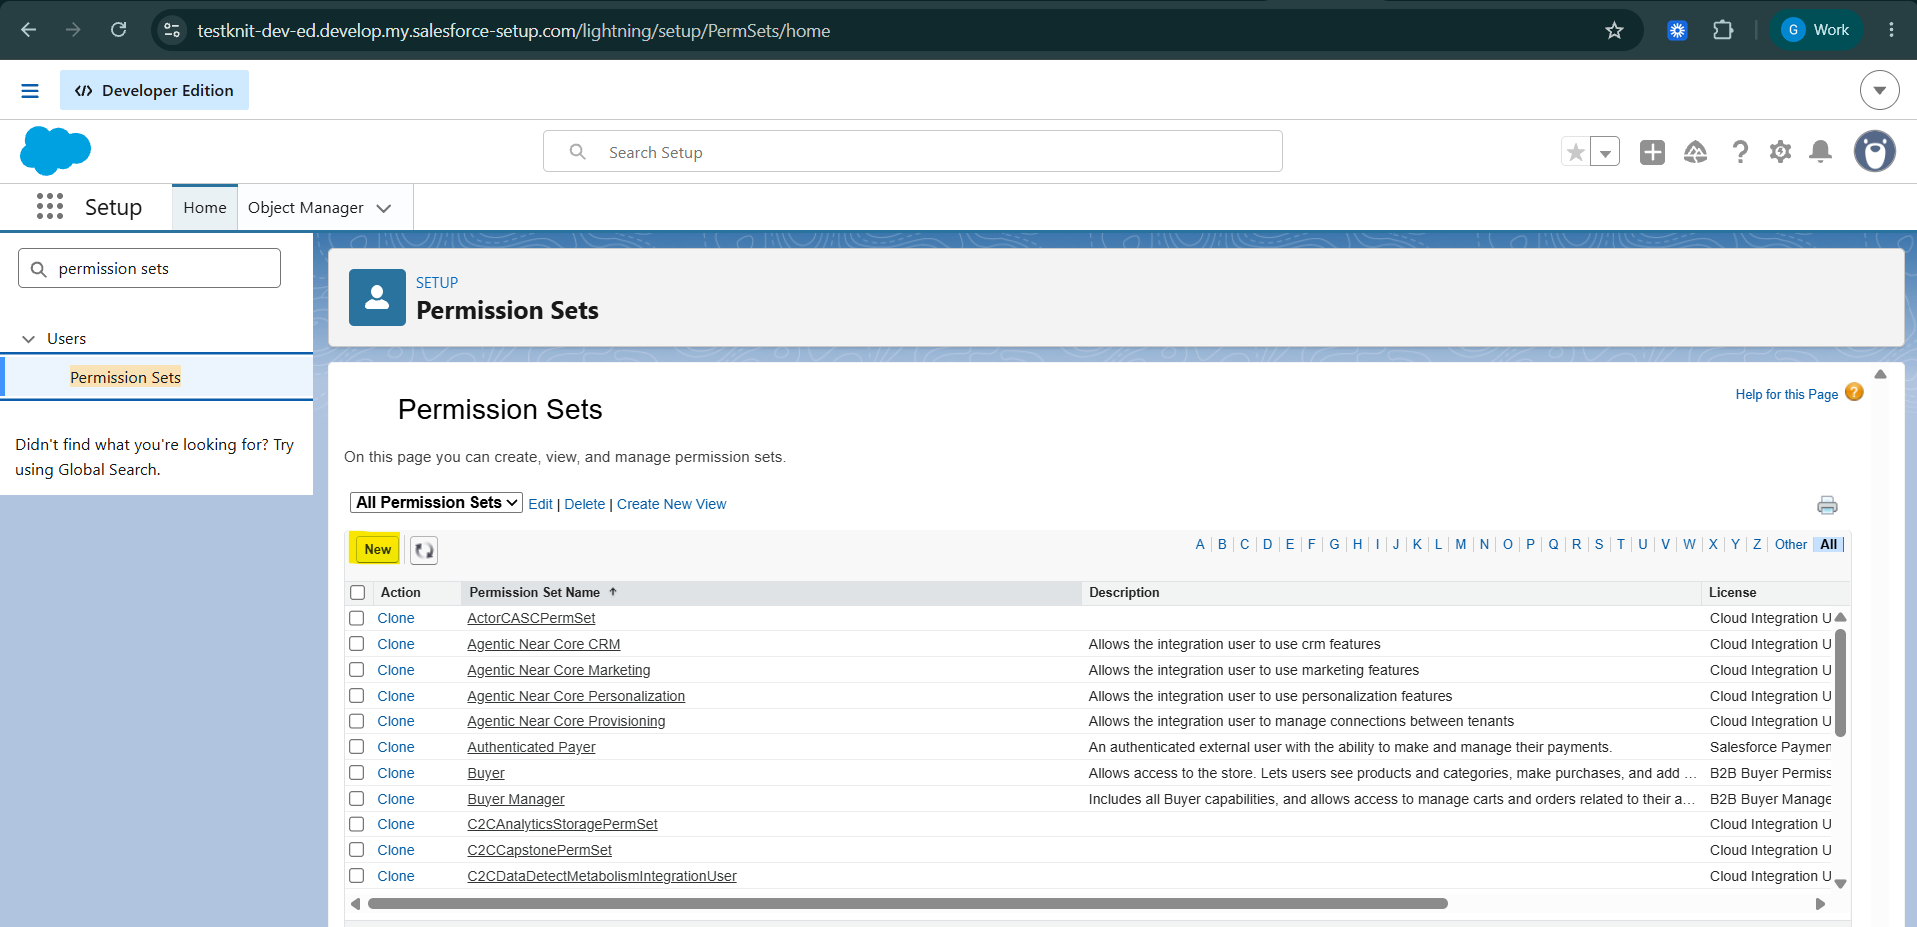
Go to Setup, search for Permission Sets in the Quick Find box, and open it.
-
Click New (the button sits above the alphabet-filter row on this list - easy to miss).
-
Enter a Label (for example,
Integration Access) and set License to Salesforce API Integration.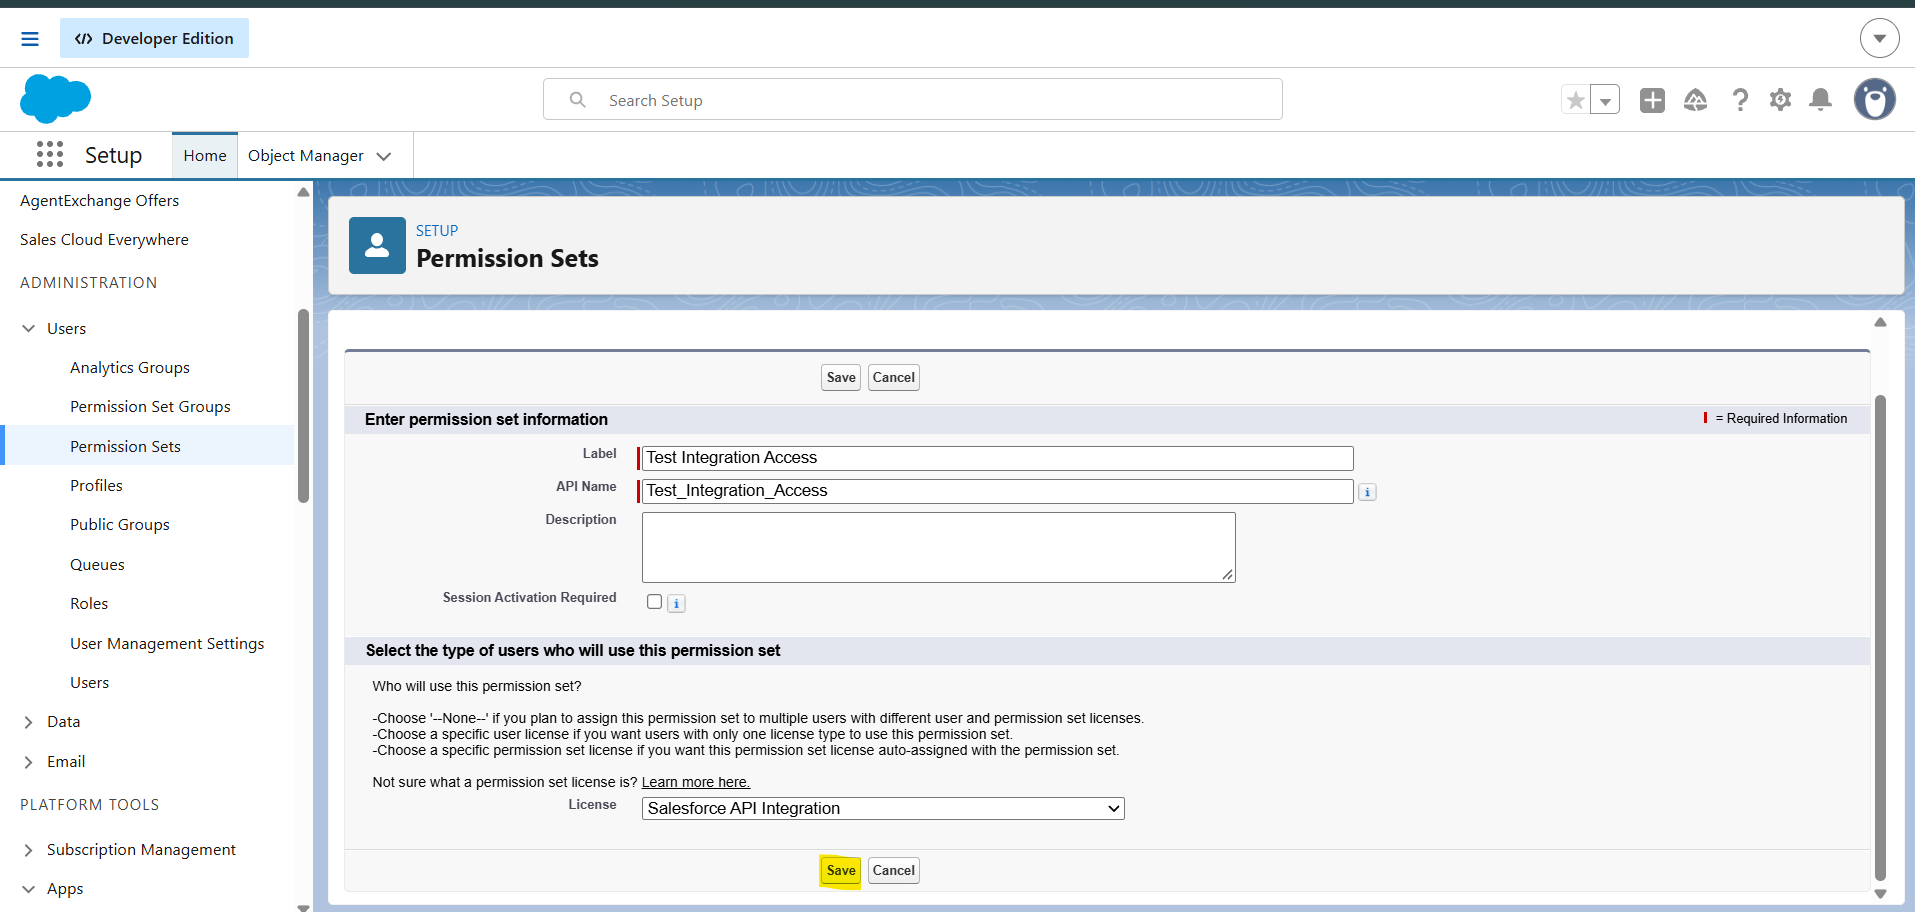
-
Click Save.
-
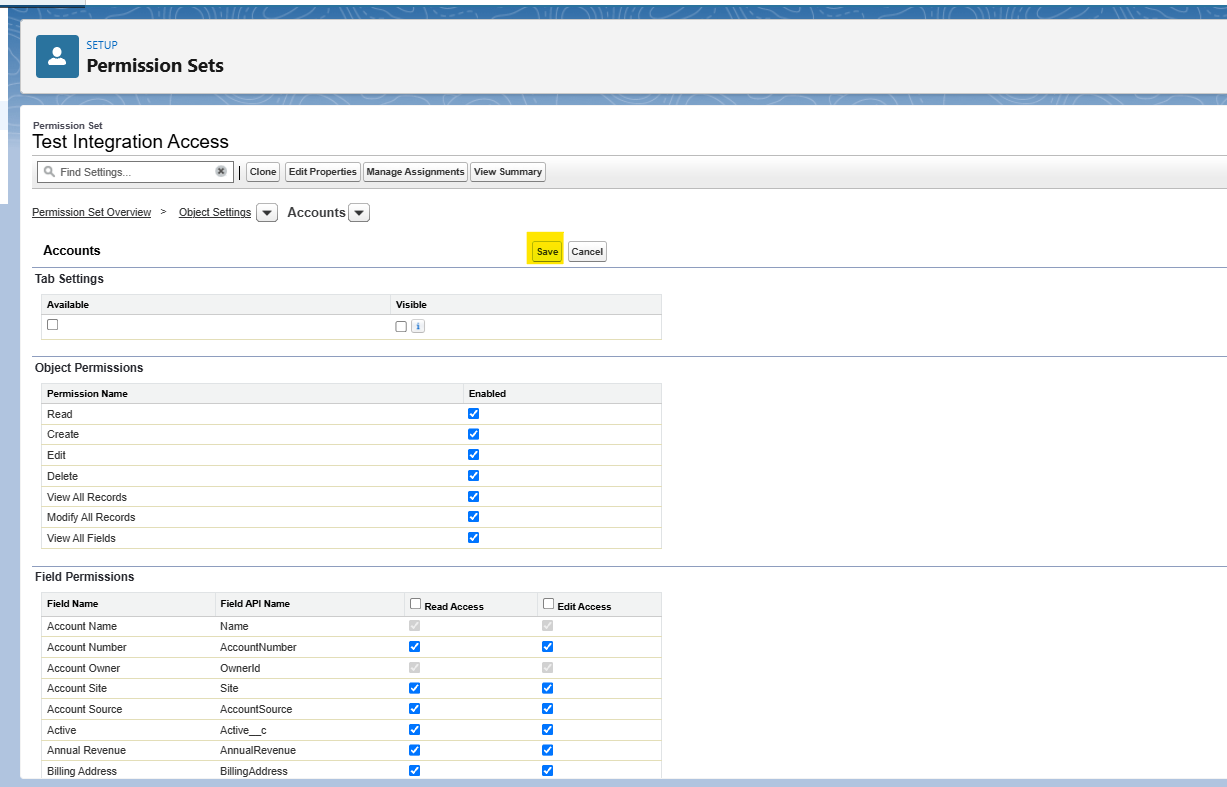
Open Object Settings, select an object the integration needs (for example, Accounts or Contacts or Opportunities or Leads or Tasks etc), click Edit, and enable the required Object Permissions (Read, and Create/Edit/Delete if needed).
-
Under Field Permissions on the same page, set the fields you need to at least Read Access, then click Save. Repeat for each object the integration needs.
-
Go back to the permission set's main page, click Manage Assignments > Add Assignment, select the Integration User created in Step 1, and click Assign and then Save.
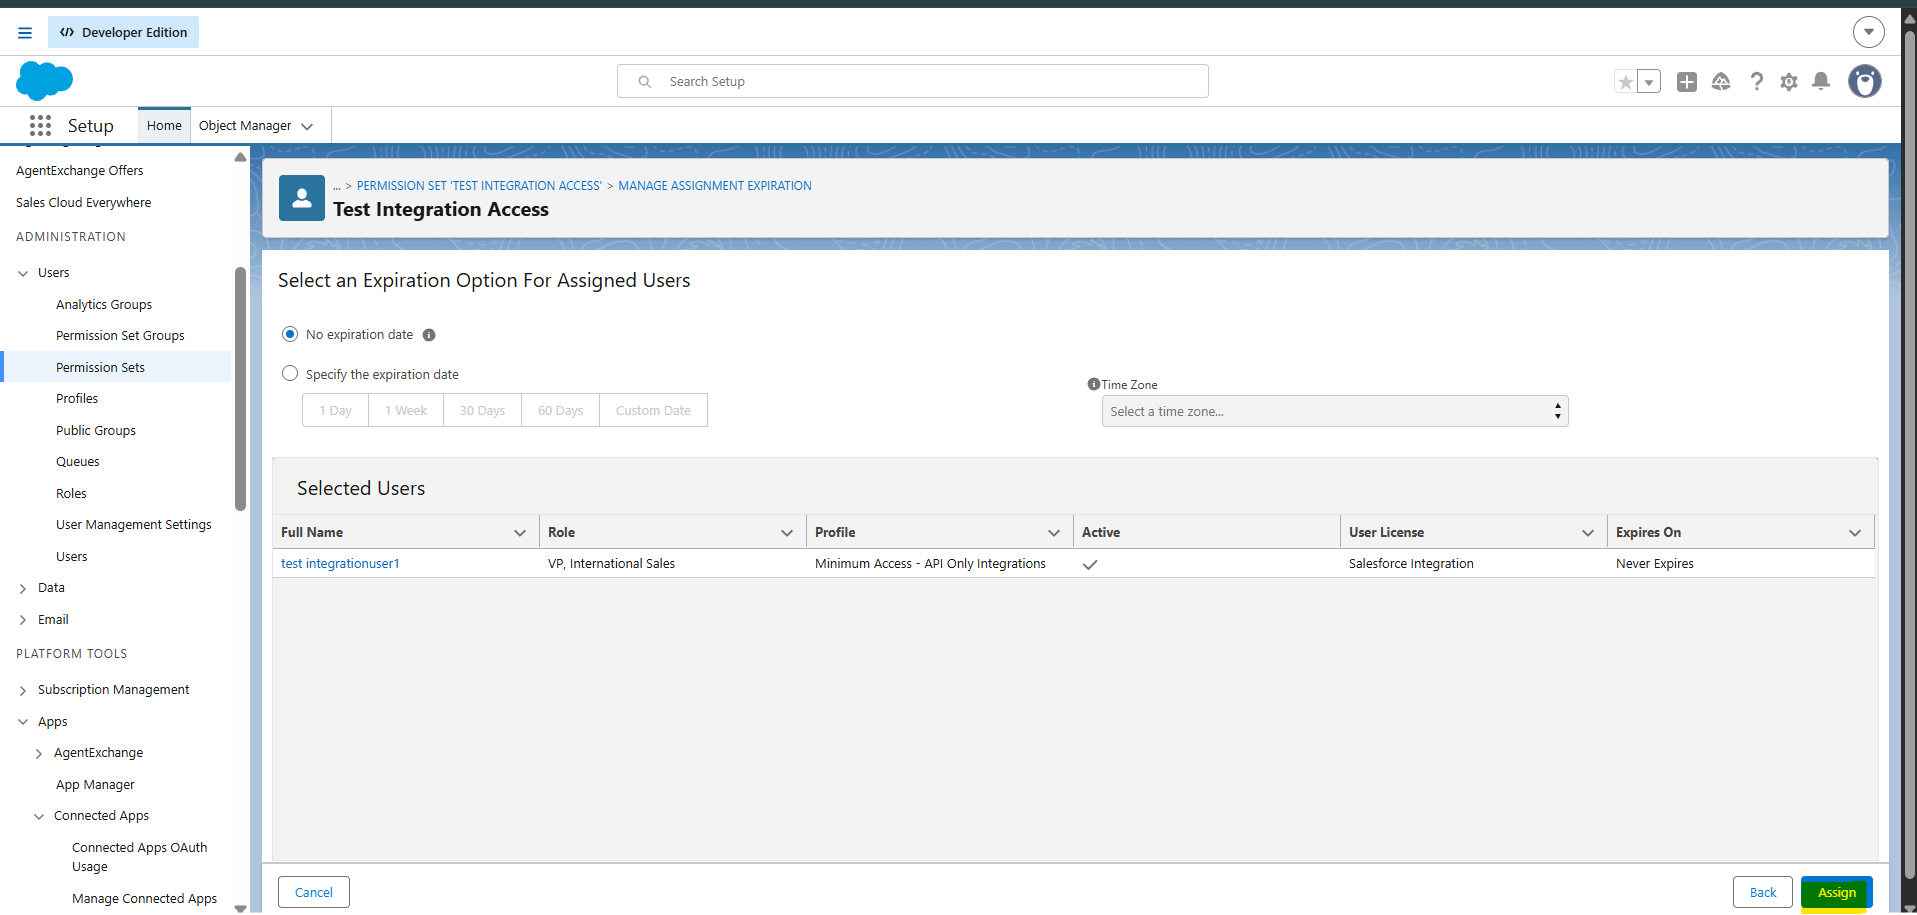
Keep this permission set scoped to data access only. Do not try to reuse it for authorizing the Connected App in Step 3 - Salesforce blocks that combination (see the note there).
Step 3: Create and configure the app
You only need one of the two subsections below, not both - pick whichever your org shows in Setup. If your org shows both, go with External Client App: it's simpler, since (as covered in each subsection) it skips the extra permission-set workaround and the duplicate "Run As" field that Connected Apps require.
Both app types need: OAuth enabled with the Manage user data via APIs (api) scope, the Client Credentials Flow turned on and pointed at the Integration User, a permission set authorizing the app to be used, and the Consumer Key/Secret retrieved. Where each of these lives - and how many permission sets you need - differs between the two, so follow the matching subsection below.
External Client App
-
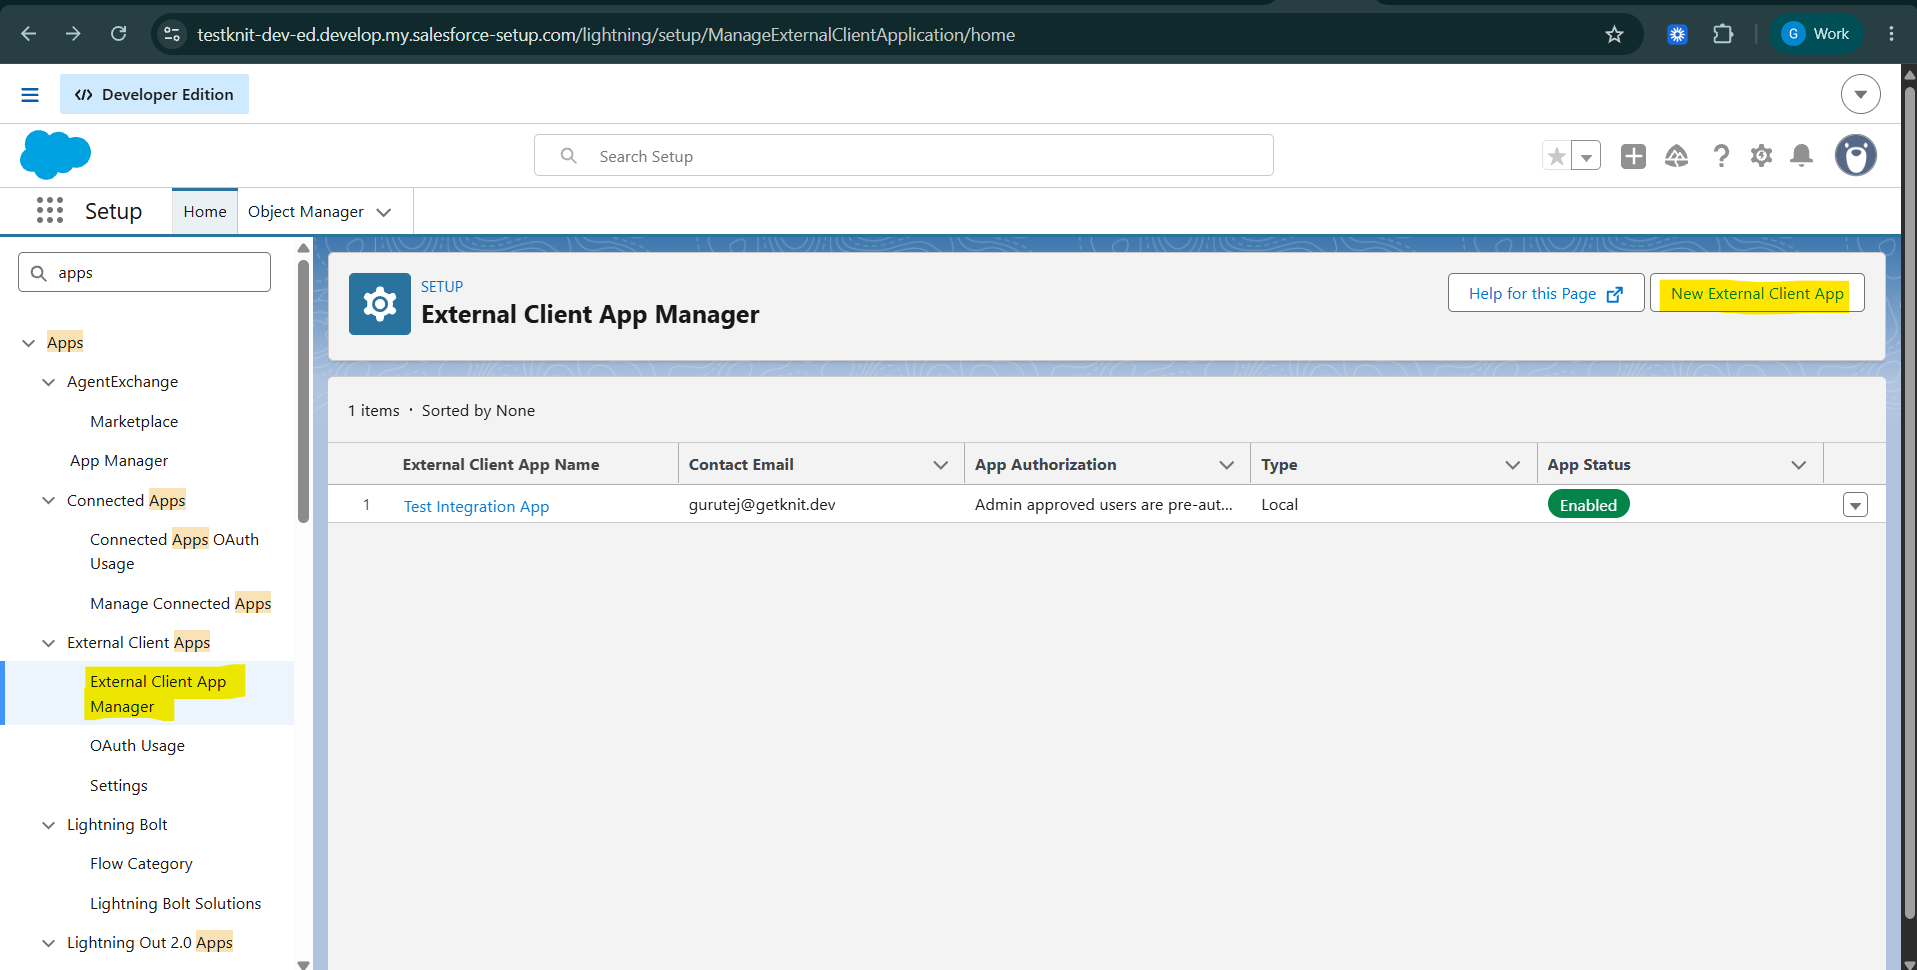
Go to Setup, search for and open External Client App Manager, then click New External Client App.
-
Under Basic Information, enter a Name, Contact Email, and leave Distribution State as Local.
-
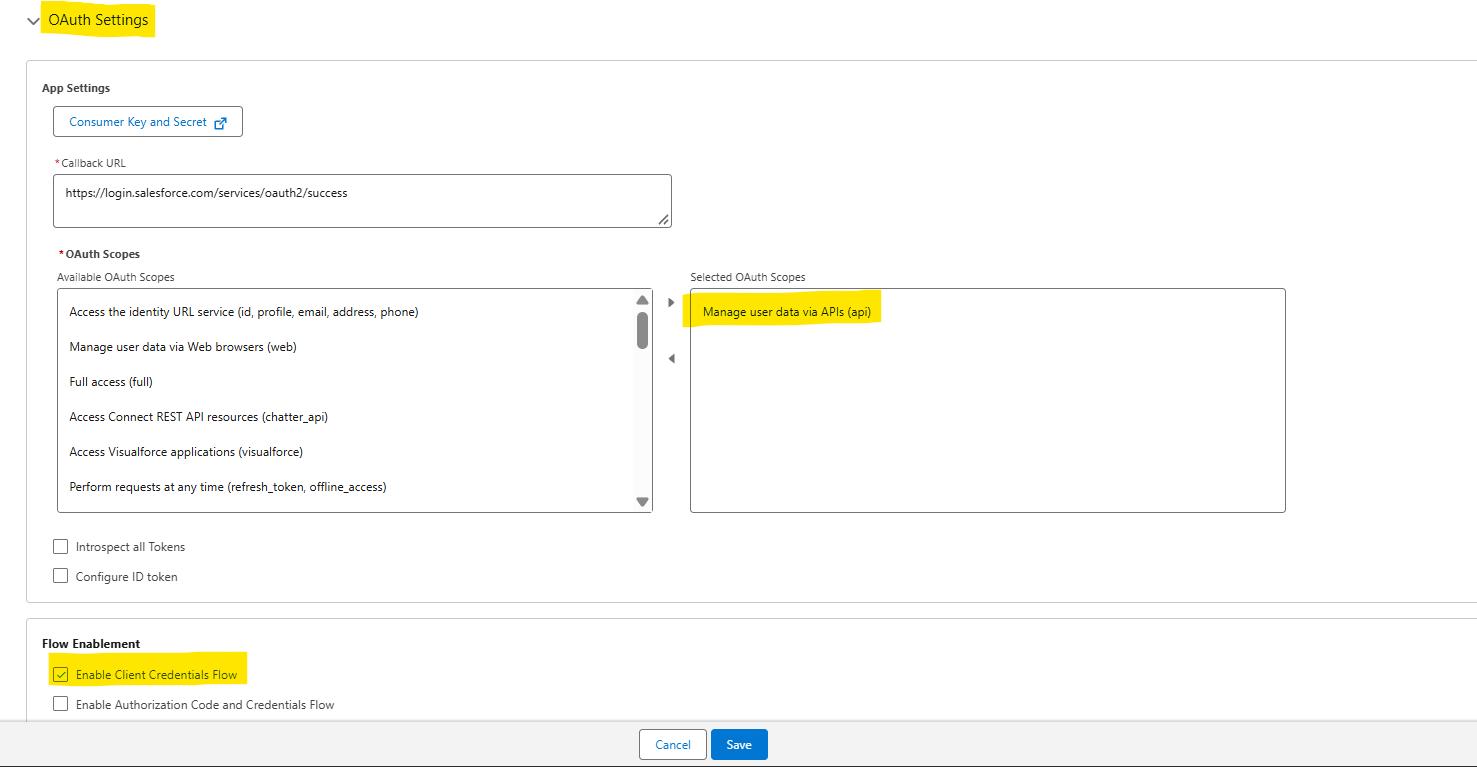
Under OAuth Settings, check Enable OAuth.
-
Enter a Callback URL, for example
https://login.salesforce.com/services/oauth2/success. -
Under Selected OAuth Scopes, add Manage user data via APIs (api).
-
Under Flow Enablement, check Enable Client Credentials Flow.
-
Click Save.
-
Open the app, go to its Policies tab, and expand OAuth Policies.
-
Under Plugin Policies, set Permitted Users to Admin approved users are pre-authorized.
-
Under OAuth Flows and External Client App Enhancements, confirm Enable Client Credentials Flow is checked, and in the Run As (Username) text field, type the Integration User's exact username from Step 1 (this is a free-text field here, not a lookup - e.g.
[email protected]).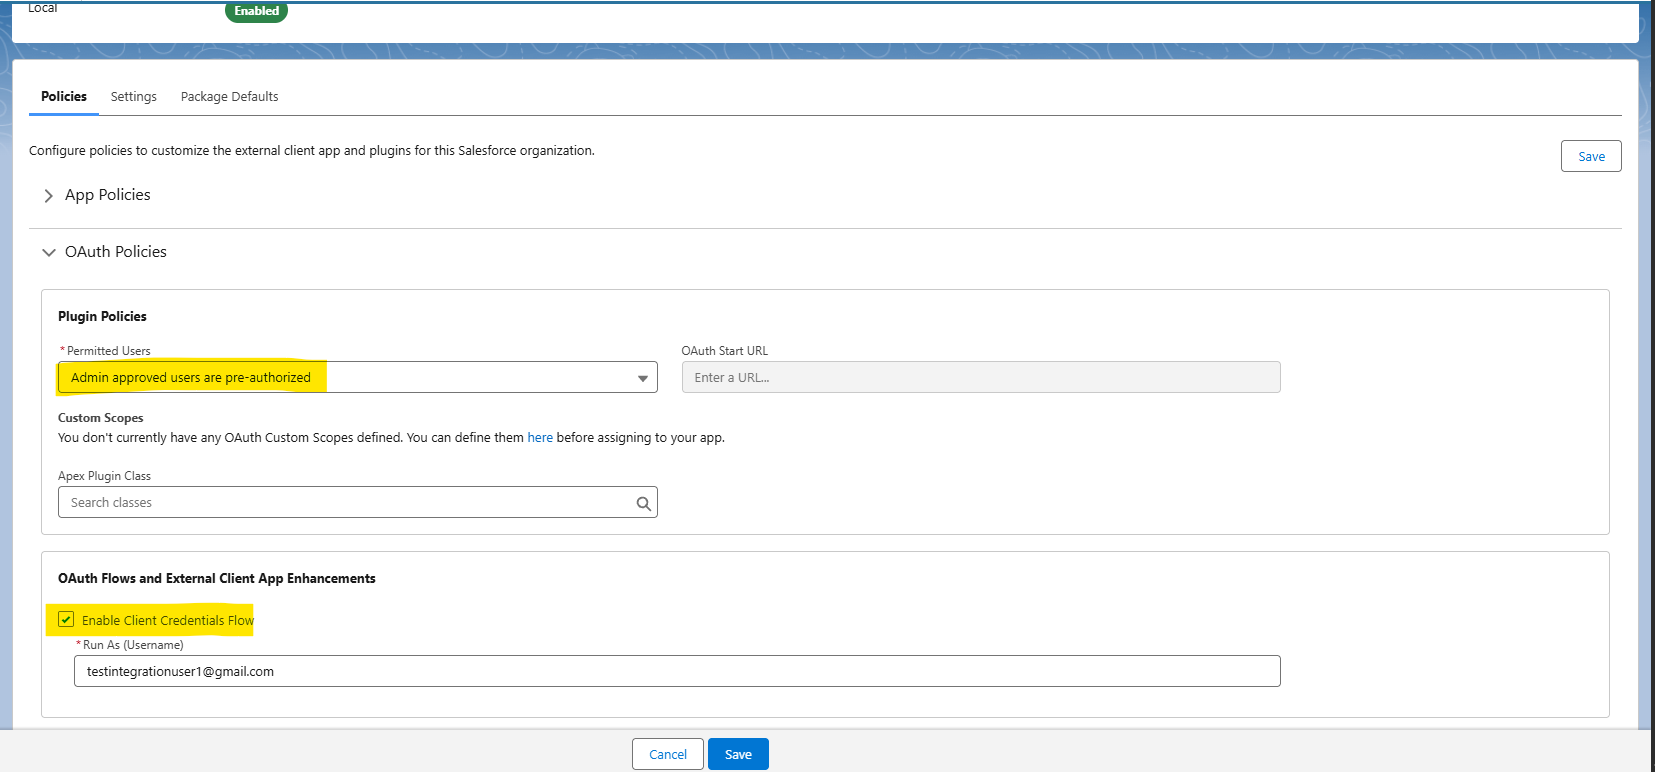
-
Click Save.
-
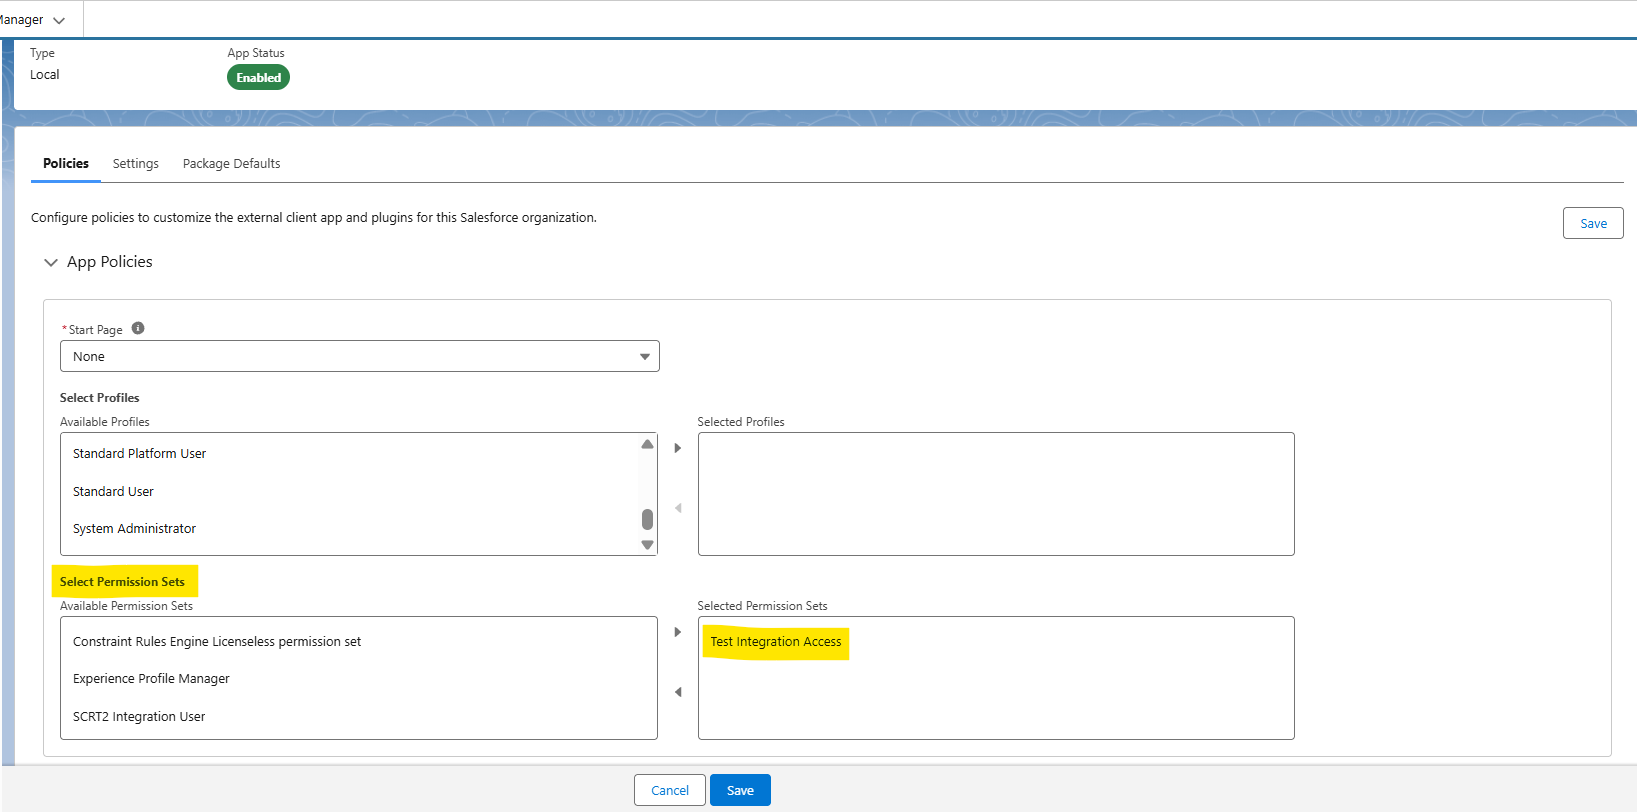
On the same Policies tab, expand App Policies, and under Select Permission Sets, add the same permission set from Step 2 (the one with the Salesforce API Integration license) directly - no second permission set is needed here, unlike the Connected App flow.
-
Click Save.
Skipping this step causes token requests to fail even when Run As is set correctly - the app stays locked to no one until a permission set is explicitly added here. But unlike Connected Apps, External Client Apps accept a Salesforce API Integration-licensed permission set here without complaint, so there's no need to create a separate one.
-
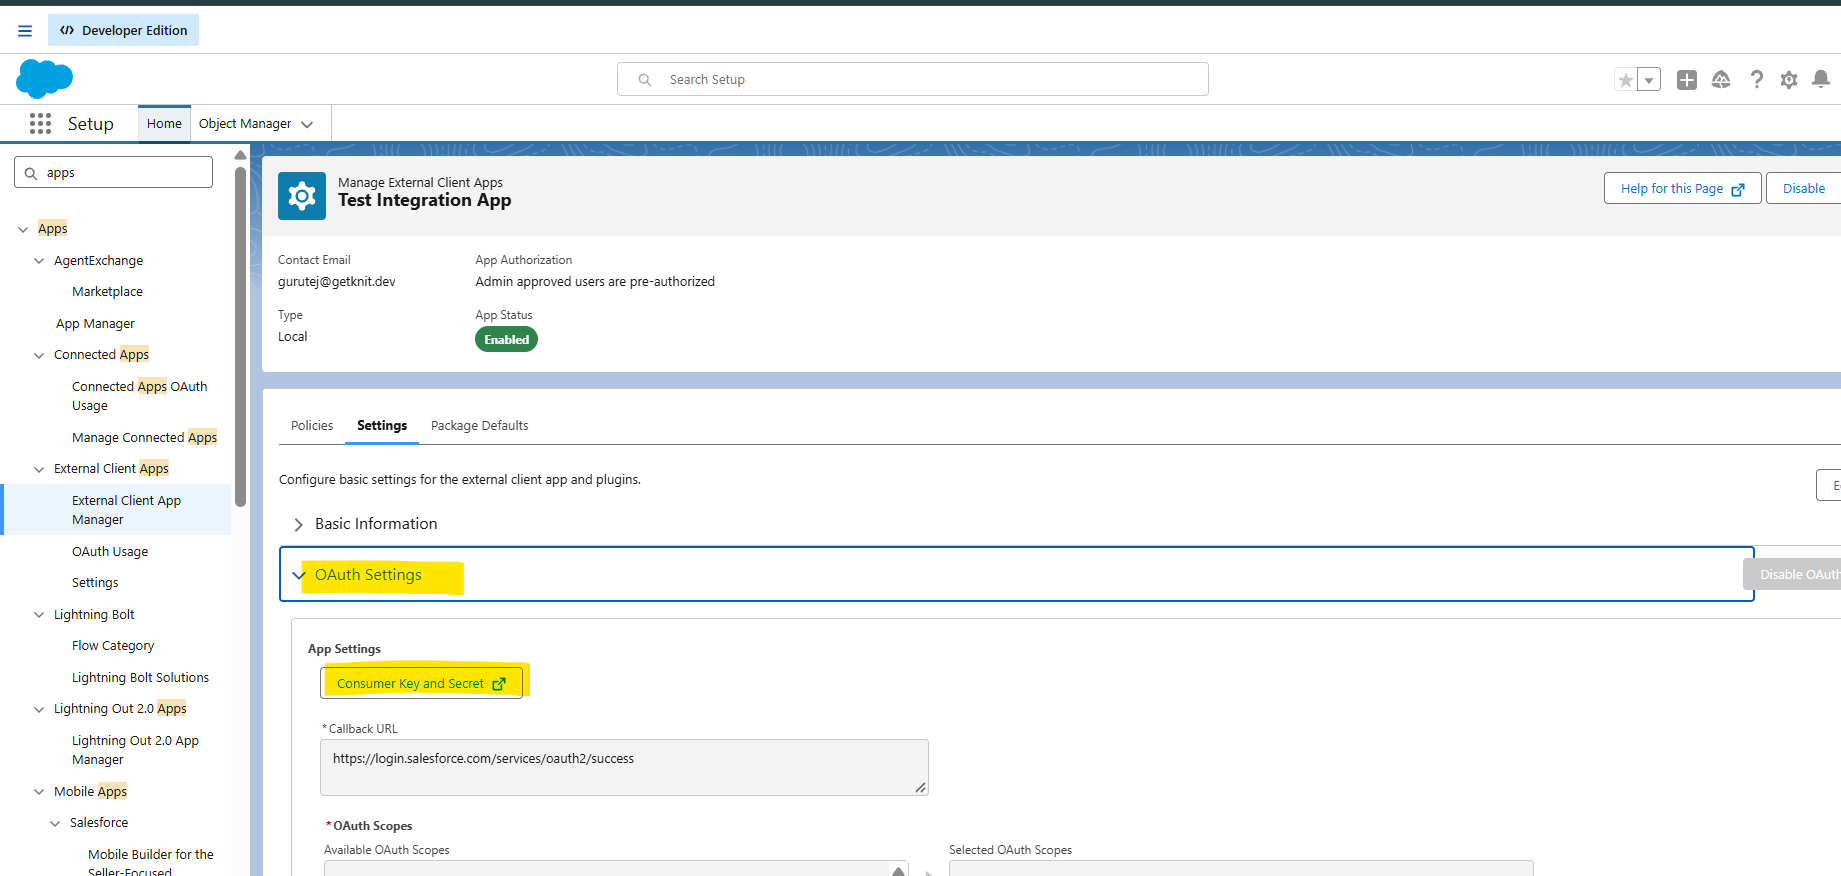
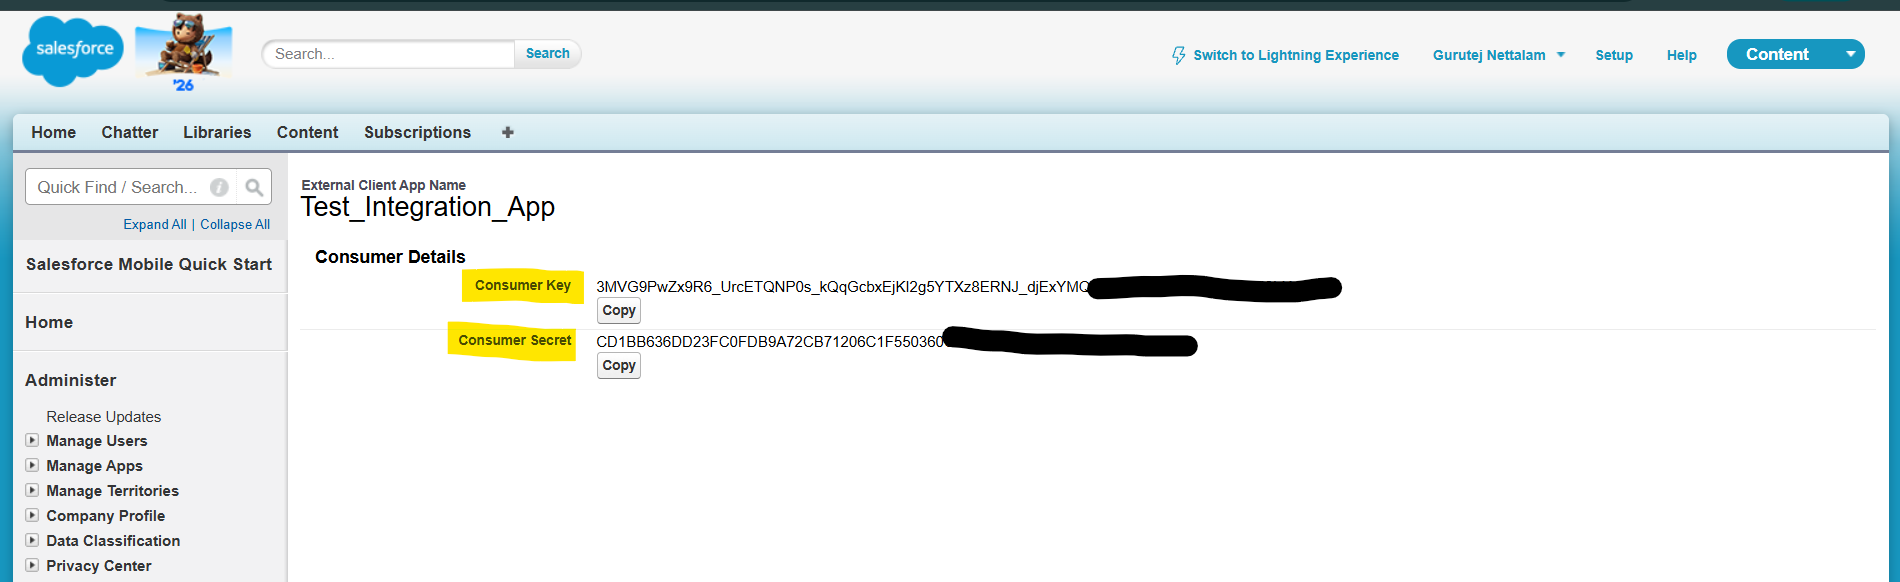
Go to the app's Settings tab, expand OAuth Settings, and click Consumer Key and Secret. A verification code is sent to your email.
-
Copy the Consumer Key - use this as the Client Id.
-
Copy the Consumer Secret - use this as the Client Secret.
-
For more details refer here.
Connected App
-
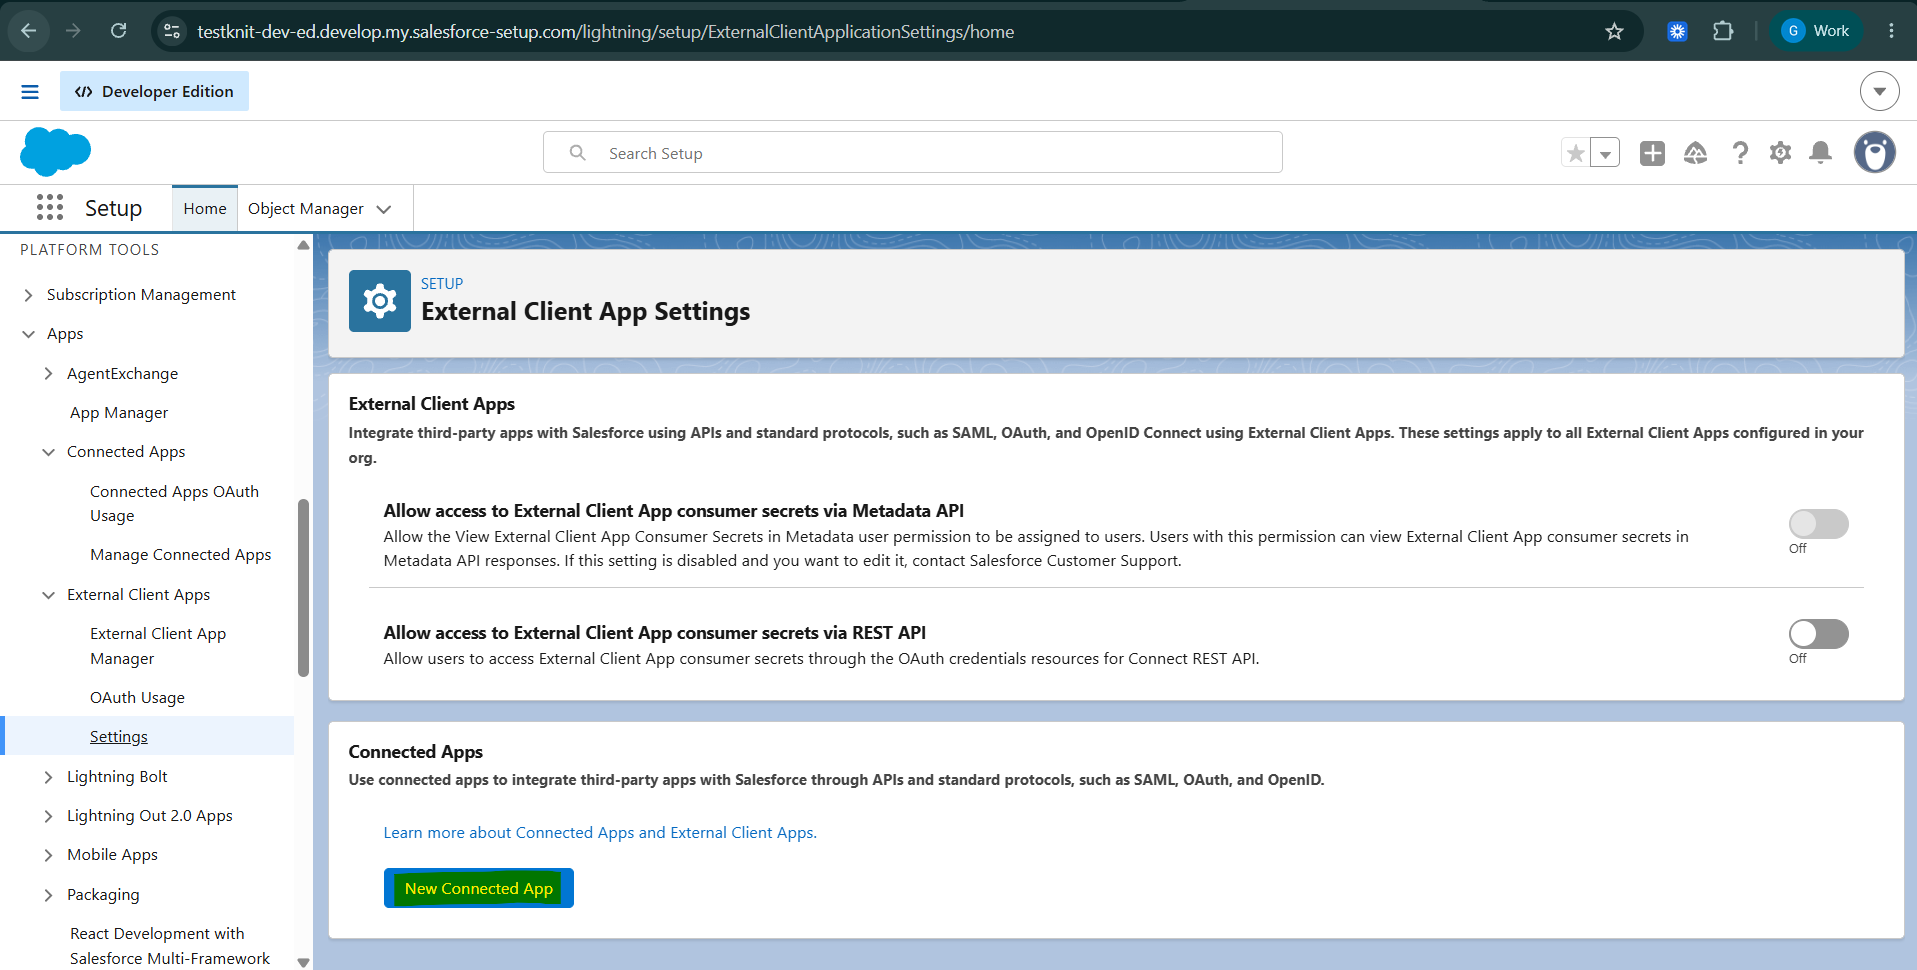
Go to Setup, search for and open App Manager, then click New Connected App. (In some versions it might be present in some other place)
-
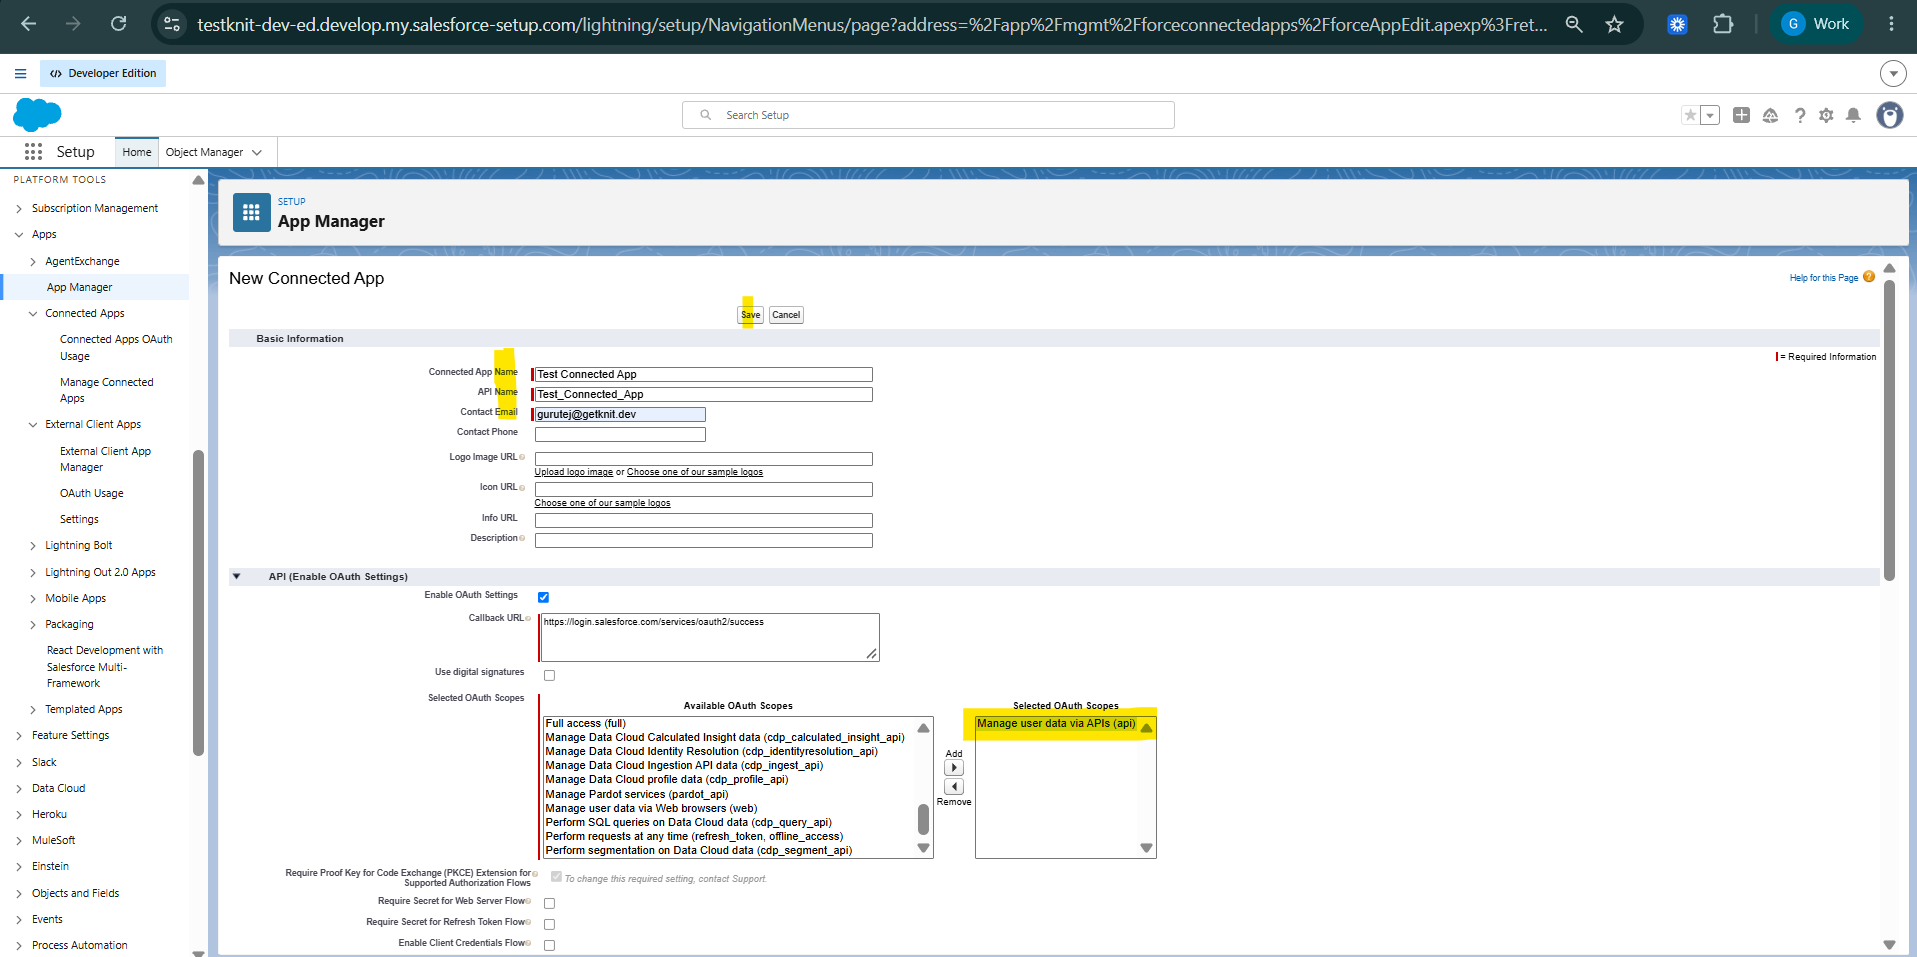
Under Basic Information, enter a Connected App Name and Contact Email.
-
Under API (Enable OAuth Settings), check Enable OAuth Settings.
-
Enter a Callback URL, for example
https://login.salesforce.com/services/oauth2/success. Salesforce requires a value here even though this flow doesn't use it. -
Under Selected OAuth Scopes, add Manage user data via APIs (api) to Selected OAuth Scopes.
-
On this same page, check Enable Client Credentials Flow (near the bottom of the OAuth settings section) and accept the security warning that appears. If you don't see it here for some reason, click Save first, then reopen the app from App Manager (dropdown next to the app > Edit) and check it there.
-
Click Save.
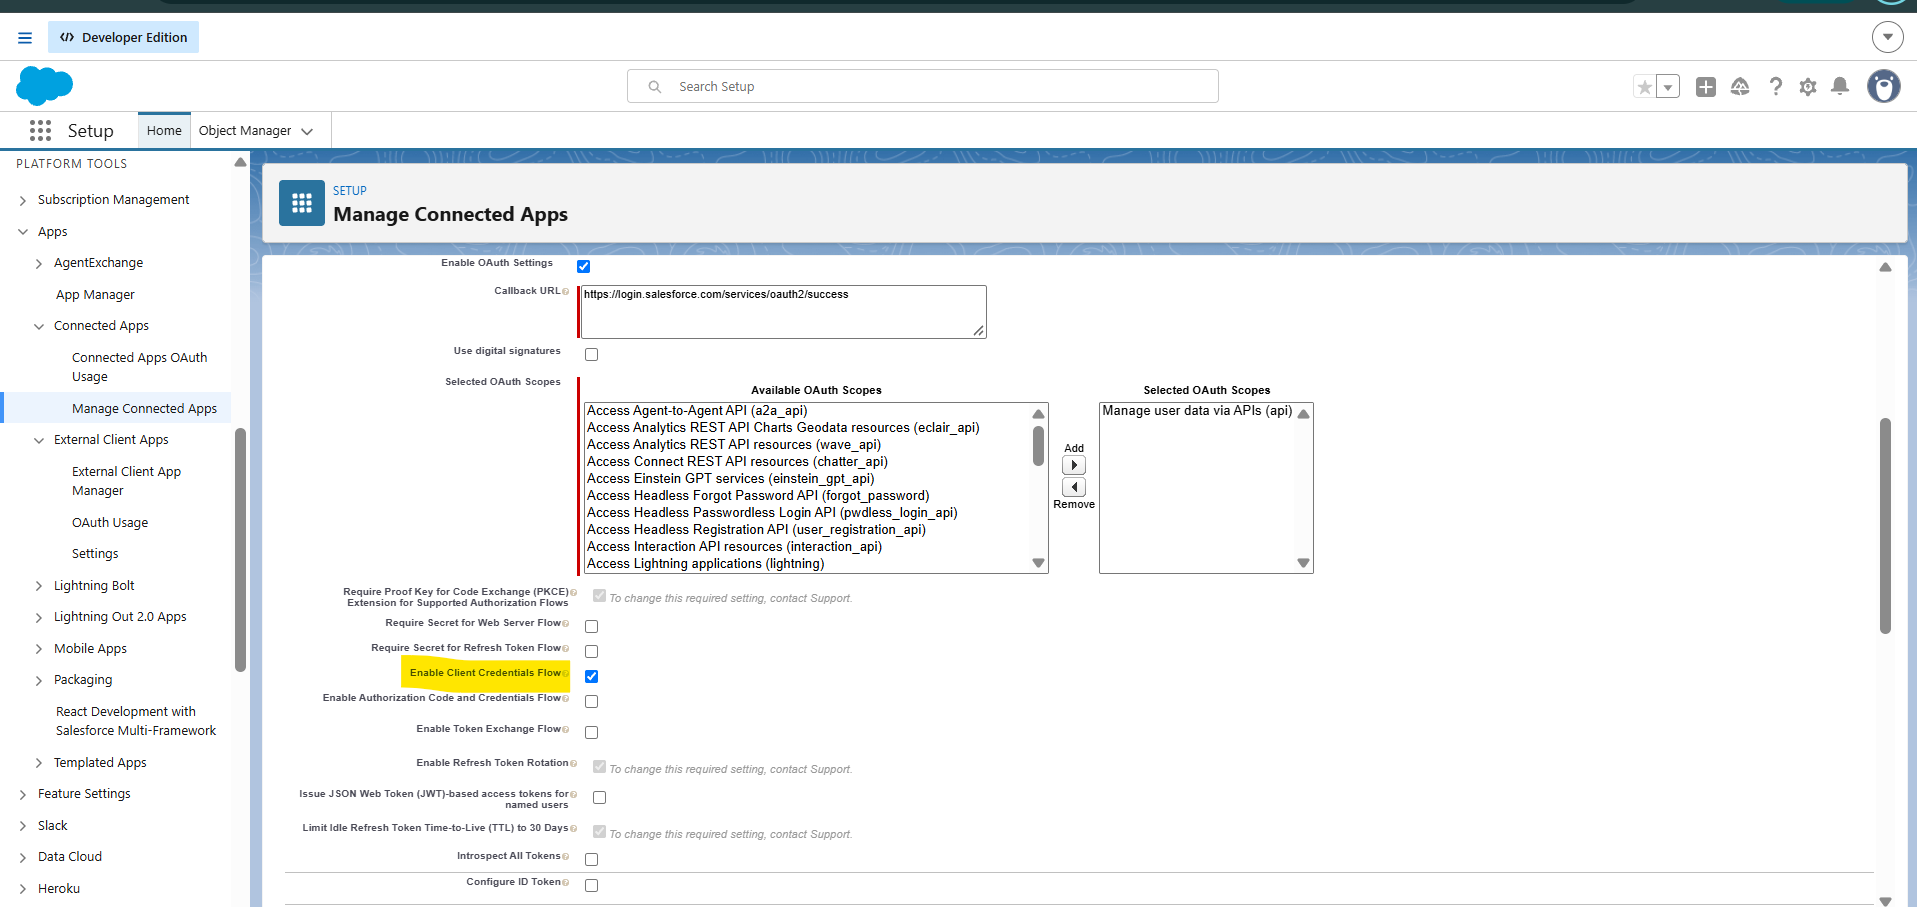
It can take a few minutes for a new app's settings to fully propagate before the next steps will work.
-
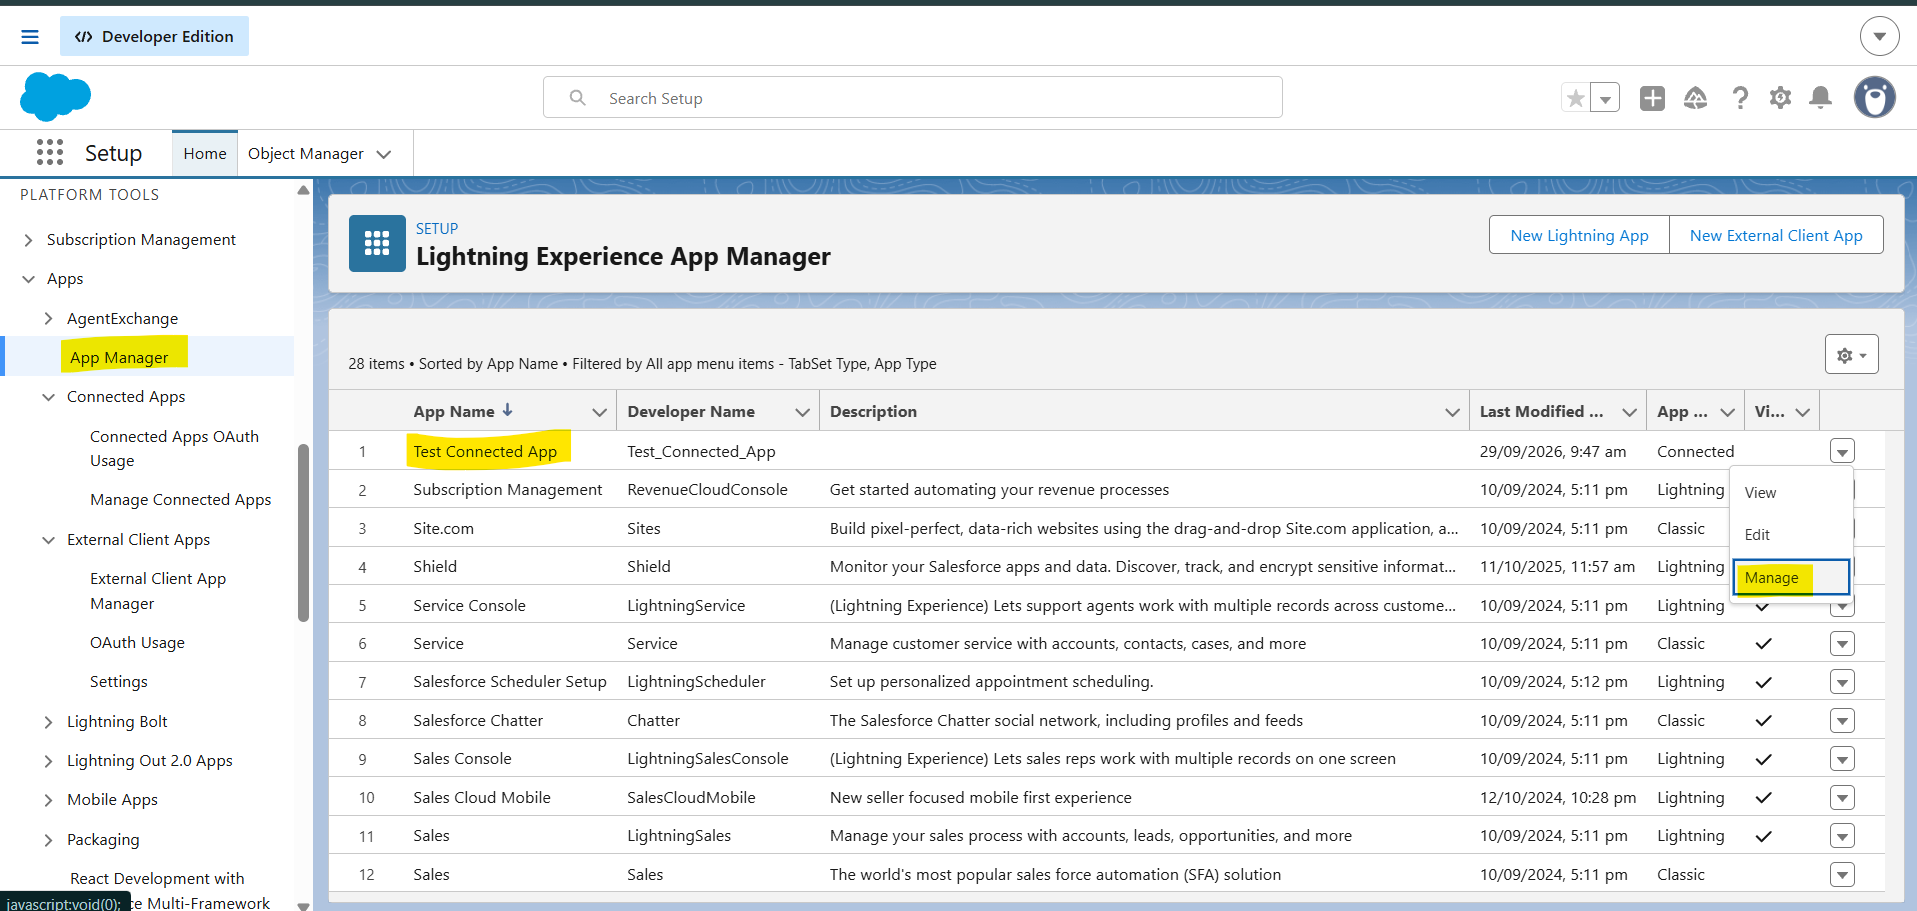
Back on App Manager, open the app's dropdown and click Manage.
-
Click Edit Policies.
-
Set Permitted Users to Admin approved users are pre-authorized.
-
Click Save.
This same Edit Policies page has a Custom Connected App Handler > Run As field. Ignore it. That field is for a custom Apex handler class, a completely different feature - it is not what the Client Credentials Flow uses to determine identity, despite the similarly-named field. The real Run As field for this flow is in Step 14 below, on a different page. Leaving this one blank is fine unless your org has an actual custom connected app handler class.
-
Create a second permission set purely for authorizing this app - go to Setup > Permission Sets > New, give it a label (for example,
Connected App Access), and set License to --None-- (not Salesforce API Integration). -
Click Save. You don't need to open Object Settings or grant anything inside it - it can stay empty.
-
From this permission set's page, click Manage Assignments > Add Assignment, select the same Integration User from Step 1, and click Assign.
Why a second permission set: Salesforce rejects any attempt to attach a permission set carrying the Salesforce API Integration license to a Connected App's authorization list, with the error "The permission set license doesn't allow Assigned Connected Apps." So the permission set from Step 2 (which needs that license to grant object access) can never be the one used here - you need this separate, License-None one instead. This restriction is specific to Connected Apps; External Client Apps don't have it (see that subsection above).
-
Back on App Manager, open the app's dropdown and click Manage again.
-
Under Permission Sets, click Manage Permission Sets, check the second (License-None) permission set from step 12-14 above, and click Save.
Skipping this step causes token requests to fail even when everything else below is set correctly - the app stays locked to no one until a permission set is explicitly added here.
-
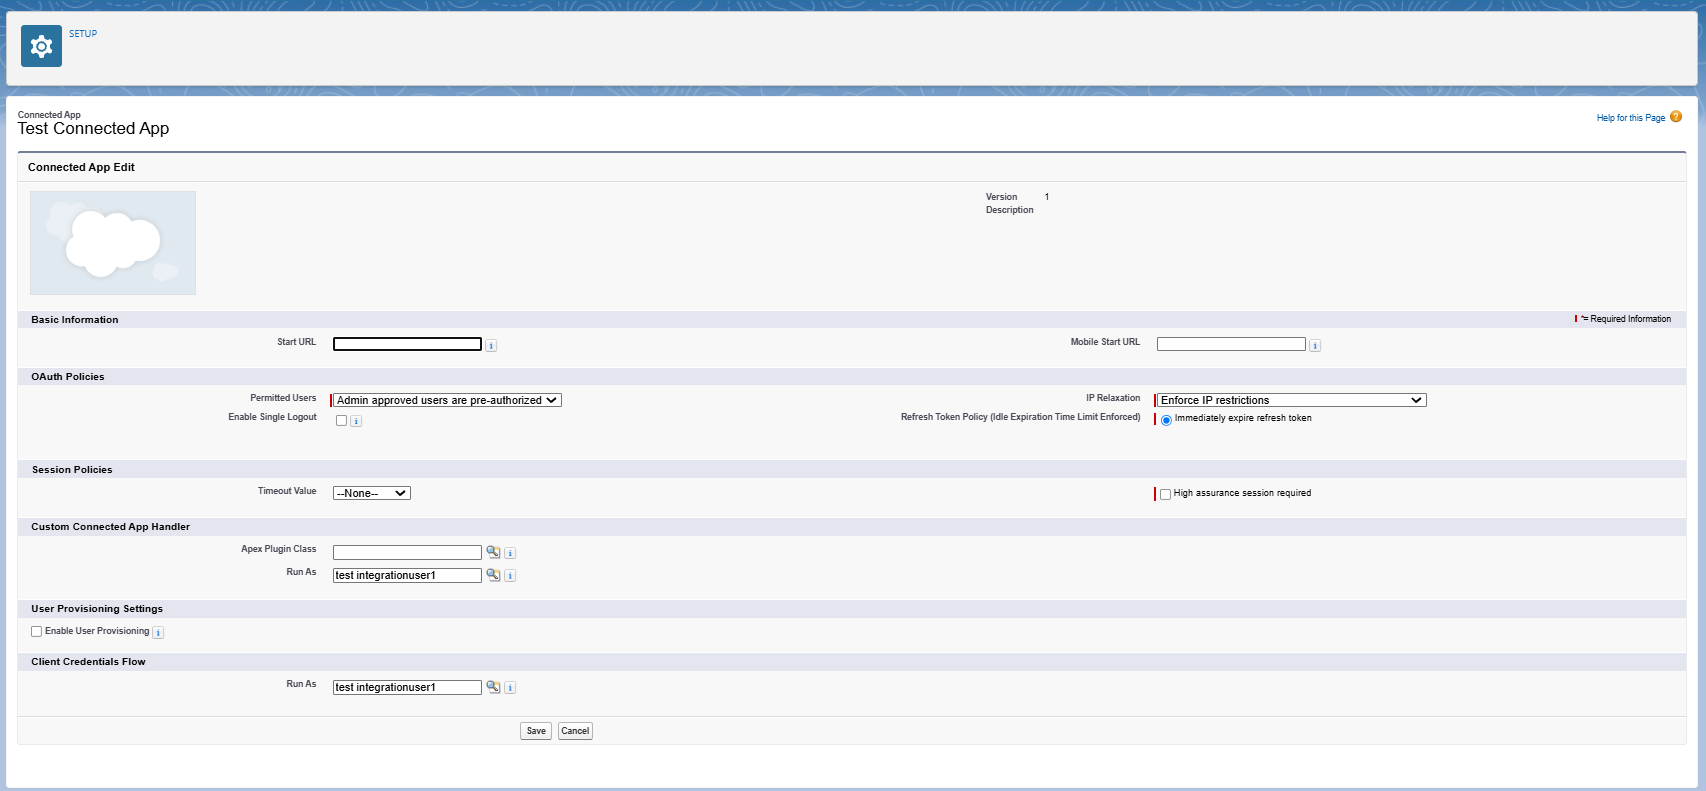
Now go back to App Manager, open the app's dropdown, and click Edit (the full edit page - not Manage, and not Manage > Edit Policies).
-
Scroll down past Custom Connected App Handler and Mobile App Settings, near the bottom of the page, to a section literally titled Client Credentials Flow. It has its own Run As field.
-
Set this Run As to the Integration User from Step 1 (search by name using the lookup icon).
-
Click Save.
-
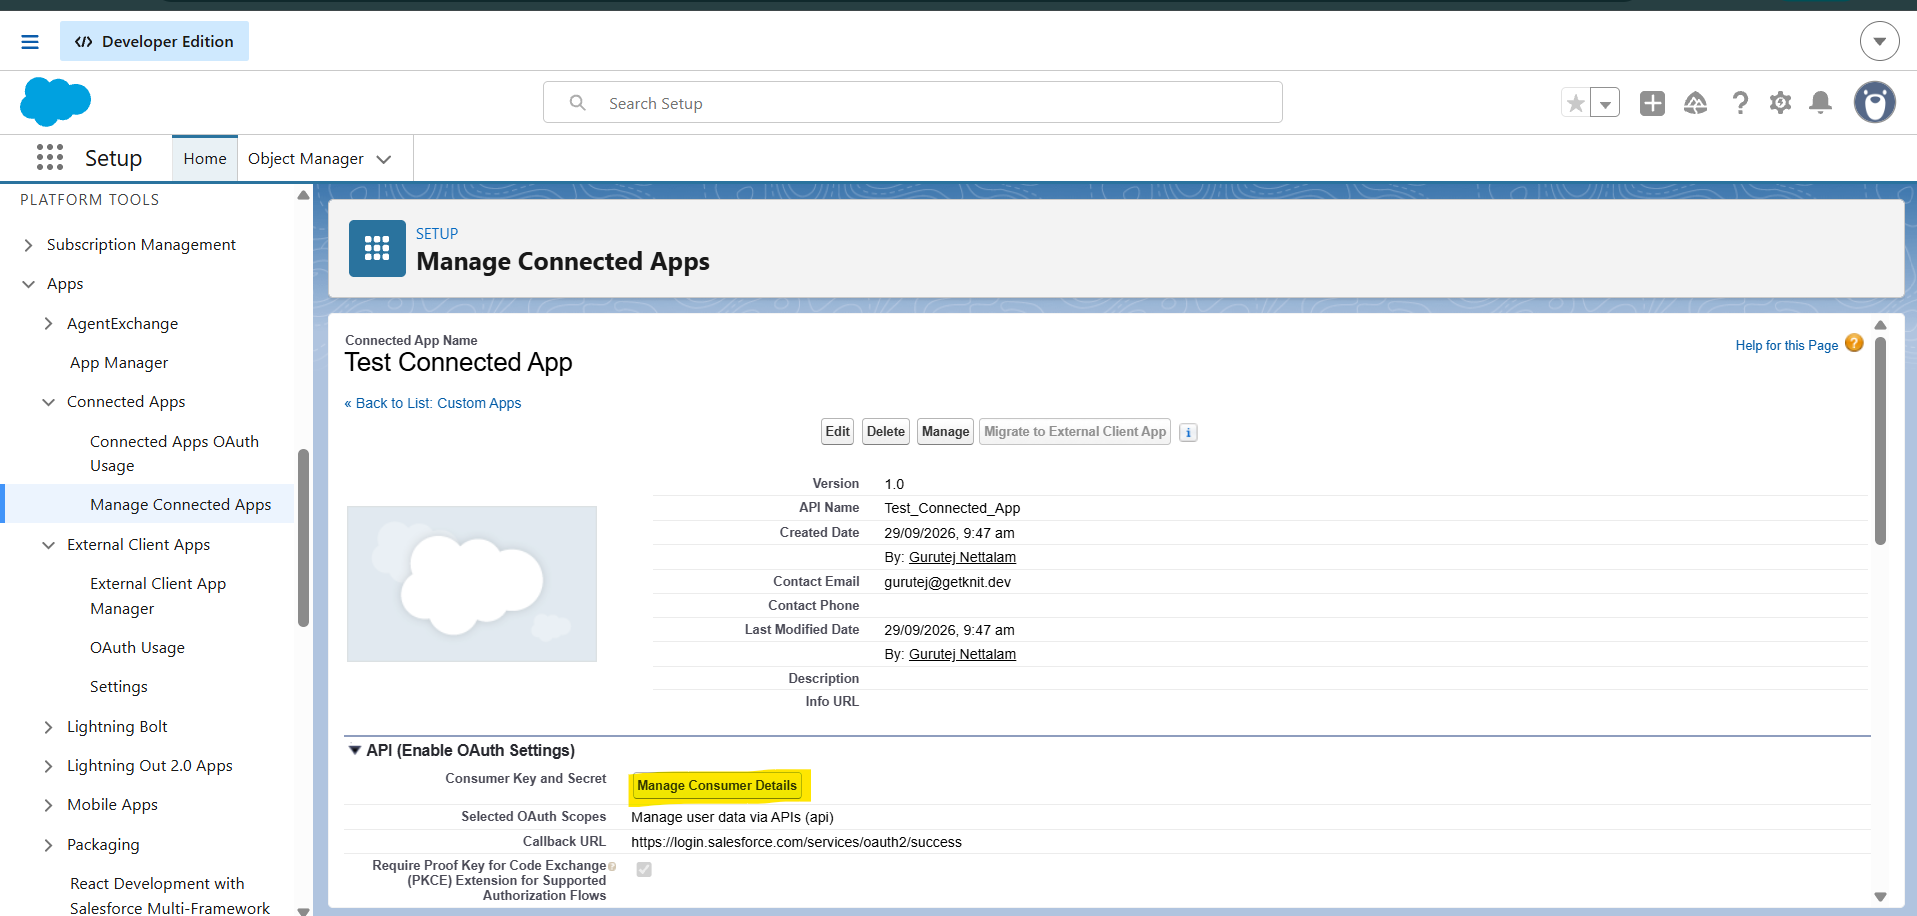
Back on App Manager, open the app's dropdown and click View.
-
Under API (Enable OAuth Settings), click Manage Consumer Details. A verification code is sent to your email.
-
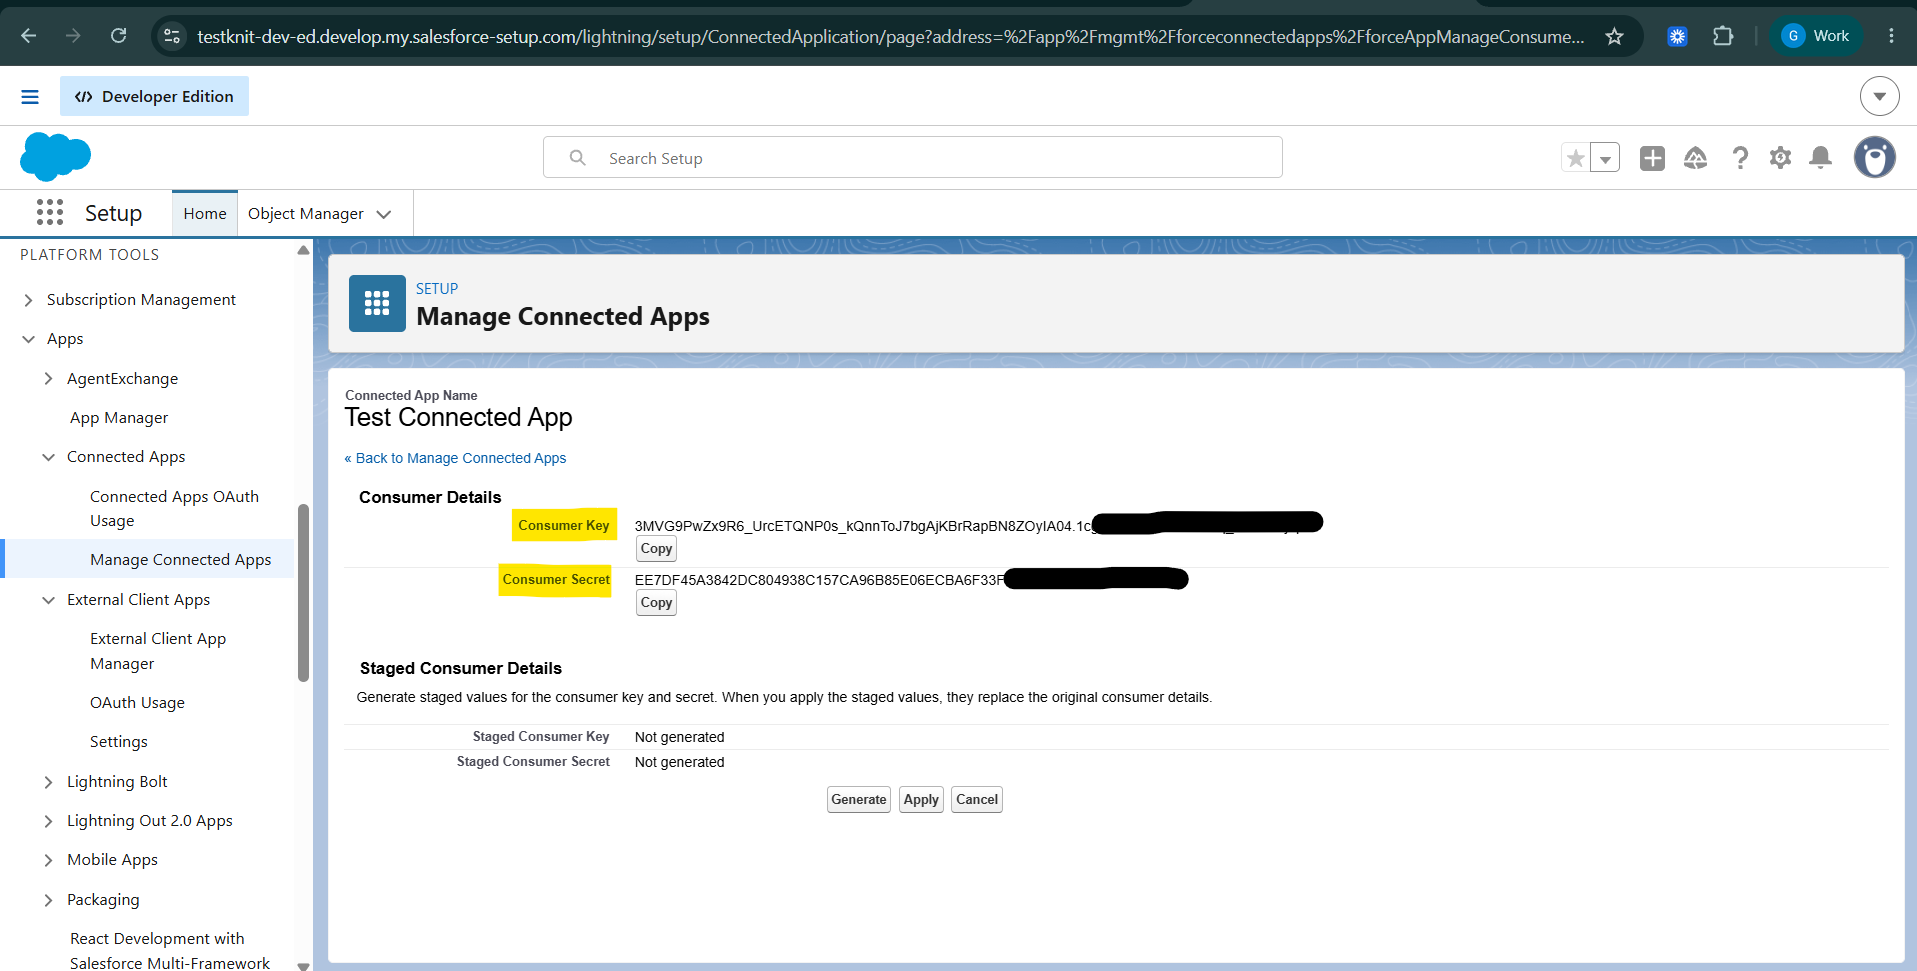
Copy the Consumer Key - use this as the Client Id.
-
Copy the Consumer Secret - use this as the Client Secret.
Step 4: Get your SubDomain
Your SubDomain is your org's My Domain, found under Setup > My Domain. Enter everything before .salesforce.com, for example:
- Production:
yourcompany.my - Sandbox:
yourcompany--sandboxname.sandbox.my - Enter the subdomain for your SalesForce account below.
For example, if you sign in atacme.my.salesforce.com, enter "acme.my".
Do not enter the fullacme.my.salesforce.com
Use the Client Id, Client Secret, and SubDomain to complete the integration setup.
Updated 10 days ago