Adobe Acrobat Sign API
Here's everything you need to know about integrating Adobe Acrobat Sign with Knit and making API calls
Integrating Adobe Acrobat Sign with the Knit UI component
To get started with using Adobe Acrobat Sign APIs, first you'll have to create an OAuth application inside adobe
How to create OAuth app?
-
To create an OAuth App, start by going to the Applications List page
-
Select the Create (+) icon and provide details about your app.
-
Choose the CUSTOMER domain and click on Save
-
Now, you should see your newly created app in the Applications List.
-
Select your app, and click on Configure OAuth for Application

-
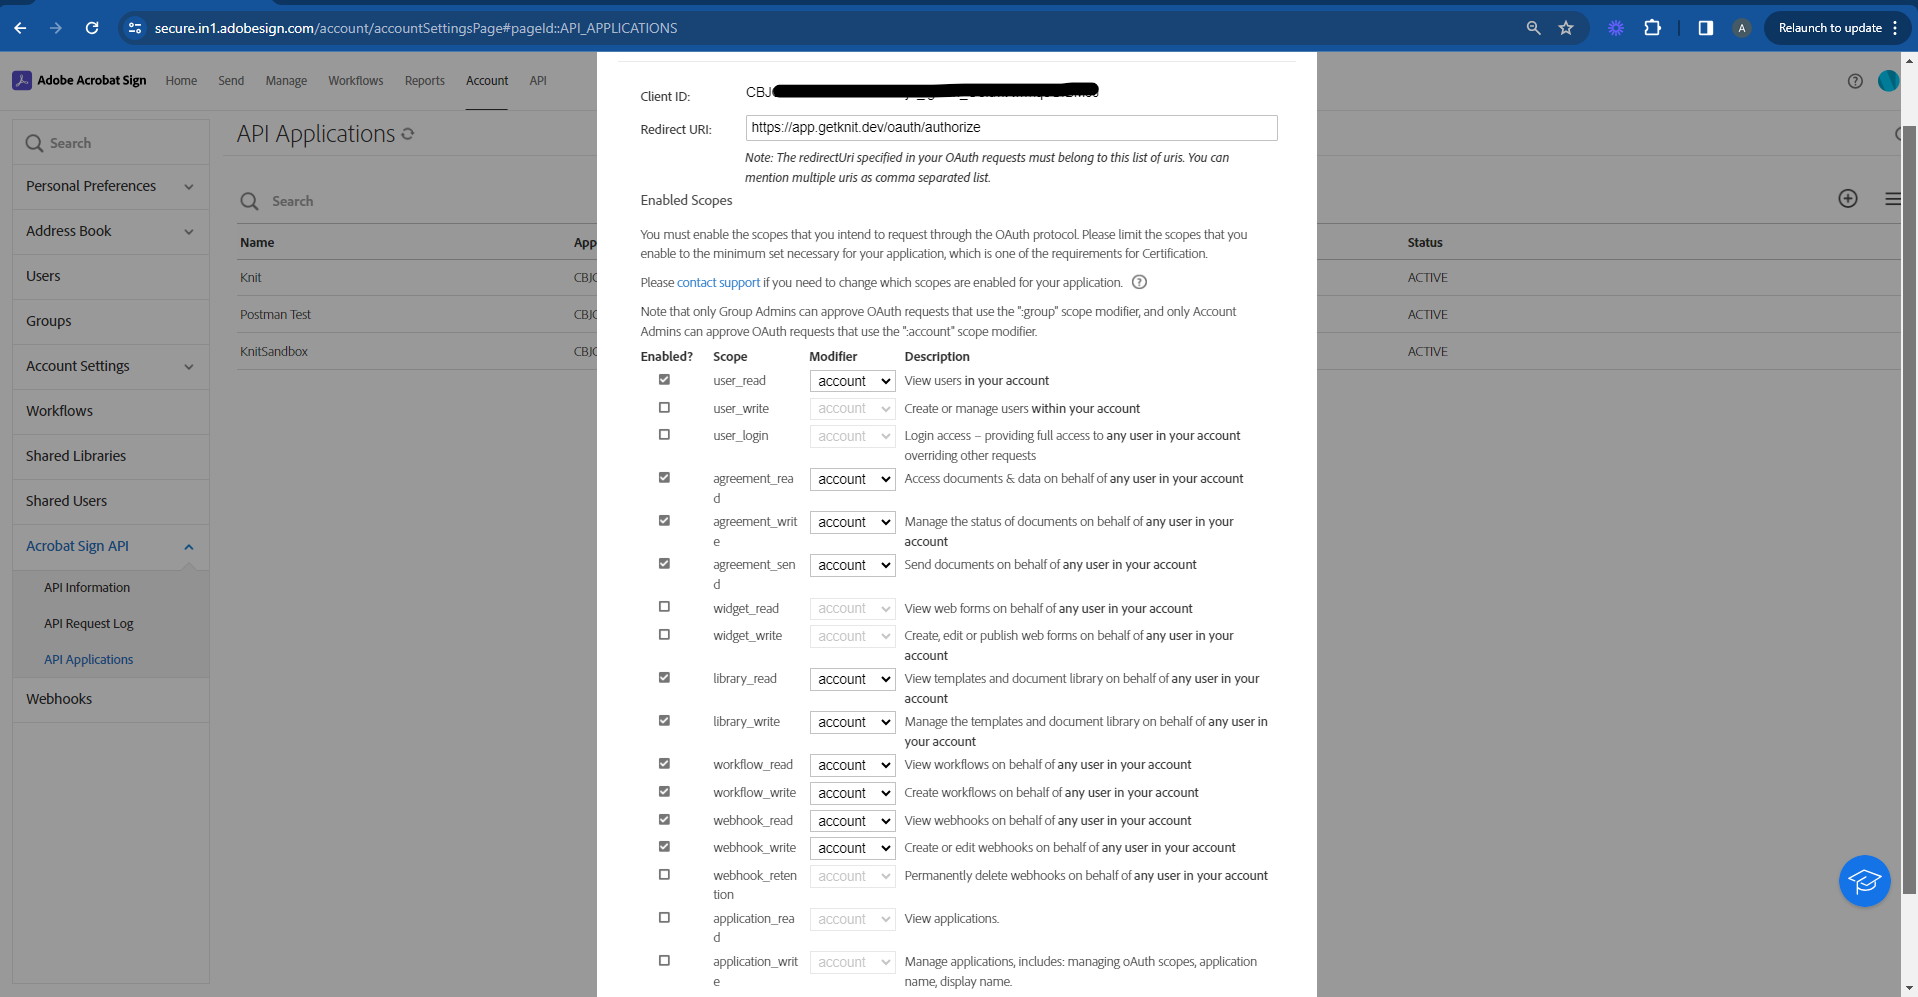
Here, do the following and then click on Save:
- Set the redirect URL to https://app.getknit.dev/oauth/authorize
- Select the following scopes: user_read, agreement_read, agreement_write, agreement_send, library_read, library_write, workflow_read, workflow_write, webhook_read, webhook_write
-
From the applications list, click on "View/Edit". From this screen, copy for Application ID and Client Secret

Adding credentials in the Knit UI Component
Once you have your app credentials, you can use those to integrate with Adobe Acrobat Sign in the Knit UI Component

Enter the Client ID and Client Secret you got from above steps in the respective fields.
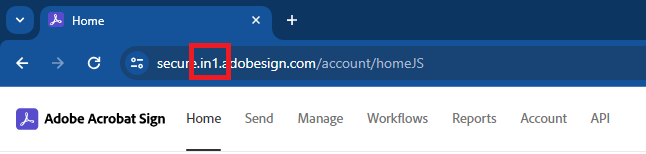
Next, enter your domain. If you sign in at https://secure.in1.adobesign.com, then your domain would be in1
That's it! Click on submit, and if you've entered the correct credentials, you should be redirected to the Adobe Sign login page, following which you will able to see that the Authorization has been successfully completed
Sending Document for Signature using Adobe Acrobat Sign API
To send a document out for signature, we'll use Knit's Send Document for Signing API.
API Parameters
The following table gives an overview of the parameters of the API and how Adobe Acrobat Sign interprets them
| Parameter | Is parameter supported? | Notes |
|---|---|---|
signers[].name | Supported | Name of the Signer |
signers[].emailId | Supported | Is mapped to the Signer's identifier. |
signers[].signType | Supported | Can either beELECTRONICWRITTEN |
signers[].comment | Supported | Is mapped to the Signer's private comment. |
documentName | Supported | |
document | Supported | Document must be in pdf format |
contentType | Supported | The content-type of the document you are sending. Click here to see examples : https://developer.mozilla.org/en-US/docs/Web/HTTP/Basics_of_HTTP/MIME_types/Common_types |
notifyForSigning | Supported | Sends direct signing link over email |
senderEmailId | Supported | |
referenceNum | Supported | A document reference number that can be used across the lifecycle of the signing process |
redirectURL | Supported | Please refer to <> to read more about post signature redirection |
webhookURL | Supported | Please refer to <> to read more about post signature webhooks |
signers[].phone | Not Supported | |
signers[].signCoordinates | Not Supported | |
senderName | Not Supported |
Sign Type must be the same for all the signersAdobe Sign does not support different sign type for different signers. The
signers[].signTypeparameter must be the same for all the signers.
A cURL request to send a document for signature could look like:
curl --request POST \
     --url https://api.getknit.dev/v1.0/sign.document.send \
     --header 'Authorization: Bearer <YOUR_API_KEY>' \
     --header 'X-Knit-Integration-Id: <YOUR_INTEGRATION_ID>' \
     --header 'accept: application/json' \
     --header 'content-type: application/json' \
     --data '
{
  "signers": [
    {
      "name": "Signer1",
      "emailId": "[email protected]",
      "signType": "ELECTRONIC",
      "comment": "Offer Letter"
    }
  ],
  "documentName": "Offer Letter.pdf",
  "document": "base64 string",
  "contentType": "application/pdf",
  "notifyForSigning": true,
  "referenceNum": "OL0001",
  "redirectURL": "https://server/redirect",
  "webhookURL": "https://server/webhook",
  "senderEmailId": "[email protected]"
}
'
And the response would look like:
{
  "documentSignId": "uniqueSignId",
  "redirectionSupported": true,
  "signers": [
    {
      "name": "Signer 1",
      "email": "[email protected]",
      "phone": null,
      "signUrl": null
    }
  ]
}
Getting the Sign URLs using Adobe Acrobat Sign API
To get the sign URLs, we'll use Knit's Get Sign URLs API.
Use the Get Sign URLs API to fetch the signing URL for each signerAdobe does not provide the signing URLs immediately after creating the document, and the signing URL is available after a delay of a few seconds. Use the Get Sign URLs API to fetch the sign URL when needed.
A cURL request to get the signing URLs could look like:
curl --request GET \
     --url 'https://api.getknit.dev/v1.0/sign.signers.url?documentSignId=<YOUR_DOCUMENT_ID>' \
     --header 'Authorization: Bearer <YOUR_API_KEY>' \
     --header 'X-Knit-Integration-Id: <YOUR_INTEGRATION_ID>' \
     --header 'accept: application/json'
And the response would look like:
{
  "signers": [
    {
      "email": "[email protected]",
      "signUrl": "https://sign_here.com/123"
    }
  ]
}
Updated about 1 year ago