Personio API
Here's everything you need to know about integrating Personio with Knit, getting data, writing data and making API calls.
Getting started with Personio APIs using Knit
To get started with Personio, first you'll need to generate the integration credentials. You'll need two things to integrate with Personio
- Client ID
- Client Secret
How to generate Integration Credentials in Personio
To generate your integration credentials, follow these steps
- Go to Settings in the lower left corner, and click on API Credentials
- Click on Generate New Credentials to open the credentials pane
- Give your credentials a meaningful name to help you identify these set of credentials
- Select all the Read, Write permissions for all the modules
- In the Readable employee attributes dropdown, click on Select All so that the credentials will be able to get all the employee attributes
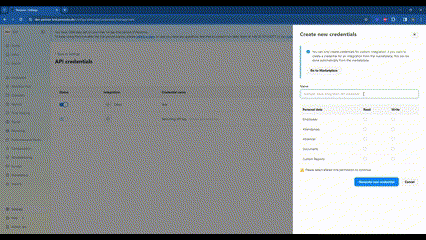
- Copy your Client ID and Client Secret
Integrating Personio with Knit UI Component
In the Knit UI component, enter the Client ID and Client Secret that you just created from the above steps
Along with these, you'll need to enter an "Application Identifier". This identifier is passed to Personio as a header in every API call and Personio might use it for identifying the caller or debugging.

That's it! Click on submit, and if you've created the user correctly, you should be able to see that the Authorization has been successfully completed
Syncing Employee Data from Personio APIs
Check out Employee Data Model
Once the integration has been successfully done, you'll be able to sync the employee data models from Personio. Knit supports the following models for Personio:
employee_profileemployee_orgStructureemployee_profilePictureemployee_compensationemployee_locationemployee_rawValues
Create an Employee in Personio API
To create an Employee in Personio, we'll use the Create an Employee API
Parameters Allowed
For this API, we can pass the following parameters:
firstNamelastNameemploymentdesignation(You can pass in any string that pertains to the employee's designation)
workEmailstartDatebirthDategenderemploymentTypedepartmentmanagerid
workAddressid(This is the Office field in the Personio dashboard)
A cURL request to create an employee could look like this:
curl --location 'https://api.getknit.dev/v1.0/hr.employee.create' \
--header 'X-Knit-Integration-Id: <INTEGRATION_ID>' \
--header 'Content-Type: application/json' \
--header 'Authorization: Bearer <API_KEY>' \
--data-raw '{
    "firstName": "Rohan",
    "lastName": "Kapoor",
    "employment": {
        "designation": "Backend Developer"
    },
    "workEmail": "[email protected]",
    "startDate": "2025-11-20T08:45:00Z",
    "birthDate": "1993-05-10T08:45:00Z",
    "gender": "MALE",
    "employmentType": "FULL_TIME",
    "department": "HR",
    "manager": {
        "id": "29148678"
    },
    "workAddress": {
        "id": "London"
    }
}'
Update an Employee in Personio API
To create an Employee in Personio, we'll use the Update an Employee API
Parameters Allowed
For this API, we can pass the following parameters
employeeIdfirstNamelastNameemploymentpositionId(You can pass in any string that pertains to the employee's designation)designation
workAddressid(This is the Office field in the Personio dashboard)
The fields not supported by this API for Personio are:
employment->workShiftIdpersonalEmailsworkAddress->addressLine1, addressLine2, city, state, country, zipCodepresentAddressworkEmail
A cURL request to update an employee could look like this:
curl --request POST \
     --url https://api.getknit.dev/v1.0/hr.employee.update \
     --header 'Authorization: Bearer <YOUR_API_KEY>' \
     --header 'X-Knit-Integration-Id: <YOUR_INTEGRATION_ID>' \
     --header 'accept: application/json' \
     --header 'content-type: application/json' \
     --data '
{
  "workAddress": {
    "id": "London"
  },
  "employment": {
    "positionId": "SDE",
    "designation": "SDE"
  },
  "employeeId": "19316530",
  "firstName": "New",
  "lastName": "Employee"
}
'
Upload a Document for an Employee API in Personio
To upload a document for an employee in Personio, we'll use the Upload Document API
Prerequisites
We'll need to get the document categories for an employee from Personio before we can upload a document. To do so, you can use the Get Document Categories API
After we have the category, we can upload the document for an employee. A sample cURL request could look like:
curl --request POST \
     --url https://api.getknit.dev/v1.0/hr.employees.document.upload \
     --header 'Authorization: Bearer <YOUR_API_KEY>' \
     --header 'X-Knit-Integration-Id: <YOUR_INTEGRATION_ID>' \
     --header 'accept: application/json' \
     --header 'content-type: application/json' \
     --data '
{
  "employeeId": "123",
  "fileName": "Test.pdf",
  "fileUrl": "url.com",
  "category": "1821849"
}
'
You can either specify thefileContentandcontentTypeor thefileUrlIf the
fileUrlis given, the file content and content type would be downloaded and calculated using that.However, if the
fileUrlis not specified, then be sure to specify thefileContentandcontentTypeparameters
Terminate an Employee API in Personio
To terminate an employee in Personio, we'll use the Terminate Employee API
Personio does not support setting a terminationDate and terminationReason through the API, so you can pass in any dummy date and string for these parameters respectively.
A sample cURL request could look like:
curl --request POST \
     --url https://api.getknit.dev/v1.0/hr.employee.terminate \
     --header 'Authorization: Bearer <YOUR_API_KEY>' \
     --header 'X-Knit-Integration-Id: <YOUR_INTEGRATION_ID>' \
     --header 'accept: application/json' \
     --header 'content-type: application/json' \
     --data '
{
  "employeeId": "12345",
  "terminationDate": "2023-11-29",
  "terminationReason": "dummy"
}
'
Personio only marks the employee asinactiveand does not take the employee through the termination processThrough this API, you can mark an employee as
inactive, however this is not equivalent to an employee having gone through the termination process in Personio as you will not be able to set data points liketerminationDateorterminationReasonfor the employee.
Personio APIs Used by Knit for Employee Sync and Actions
Used For | API Endpoint | Protocol | Authentication |
|---|---|---|---|
Generate Access Token | REST | ||
Employee Sync | REST | Bearer - Access Token | |
Create Employee | REST | Bearer - Access Token | |
Update Employee | REST | Bearer - Access Token | |
Terminate Employee | REST | Bearer - Access Token | |
Upload Employee Document | REST | Bearer - Access Token |