Digio API
Here's everything you need to know about integrating Digio with Knit and making API calls
Integrating Digio with the Knit UI component
To get started with using Digio APIs, please contact your Digio customer service representative to get your API credentials. You'll need two things:
- Client ID
- Client Secret
Once you have your API credentials, you can use those to integrate with Digio in the Knit UI Component
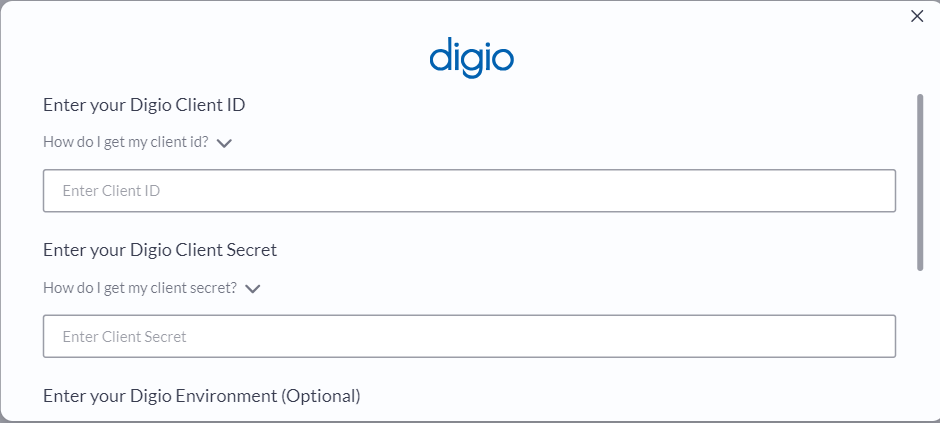
Enter the Client ID and Client Secret you got from Digio in the respective fields.
Next, select your environment.
- If you sign in at https://ext-enterprise.digio.in, then chances are that you are using the Test environment
- Otherwise, select the Production environment or leave the field blank
That's it! Click on submit, and if you've entered the correct credentials, you should be able to see that the Authorization has been successfully completed
Sending Document for Signature using Digio API
To send a document out for signature, we'll use Knit's Send Document for Signing API.
API Parameters
The following table gives an overview of the parameters of the API and how Digio interprets them
Parameter | Is parameter supported by Digio? | Notes |
|---|---|---|
| Supported | Name of the Signer |
| Supported | Is mapped to the Signer's identifier. |
| Supported | Is mapped to the Signer's identifier. |
| Supported | Can either be |
| Supported | Is mapped to the Signer's reason for signing. |
| Supported | Please refet to this link to read more about adding signature corrdinates |
| Supported | |
| Supported | Document must be in pdf or image format |
| Supported | The content-type of the document you are sending. Click here to see examples : https://developer.mozilla.org/en-US/docs/Web/HTTP/Basics_of_HTTP/MIME_types/Common_types |
| Supported | Sends direct signing link over email or sms |
| Supported | A document reference number that can be used across the lifecycle of the signing process |
| Supported | Please refer to <> to read more about post signature redirection |
| Supported | Please refer to <> to read more about post signature webhooks |
| Not Supported | |
| Not Supported |
You must pass either the signeremailIdorphoneDigio only takes in a single identifier for the signer - either the emailId or the phone number.
Please pass only a single identifier in the body - the one that you want to be considered as the primary identifier.
If you pass both the
emailIdandphone- thenemailIdwill be taken as the identifier andphonewill be ignored.
A cURL request to send a document for signature could look like:
curl --request POST \
     --url https://api.getknit.dev/v1.0/sign.document.send \
     --header 'Authorization: Bearer <YOUR_API_KEY>' \
     --header 'X-Knit-Integration-Id: <YOUR_INTEGRATION_ID>' \
     --header 'accept: application/json' \
     --header 'content-type: application/json' \
     --data '
{
  "signers": [
    {
      "name": "Signer1",
      "emailId": "[email protected]",
      "signType": "ELECTRONIC",
      "comment": "Offer Letter",
      "signCoordinates": [
        {
          "page": 1,
          "llx": 90.12,
          "lly": 236,
          "urx": 259.17,
          "ury": 298
        }
      ]
    }
  ],
  "documentName": "Offer Letter.pdf",
  "document": "base64 string",
  "contentType": "application/pdf",
  "notifyForSigning": true,
  "referenceNum": "OL0001",
  "redirectURL": "https://server/redirect",
  "webhookURL": "https://server/webhook"
}
'
And the response would look like:
{
  "documentSignId": "uniqueSignId",
  "redirectionSupported": true,
  "signers": [
    {
      "name": "Signer 1",
      "email": "[email protected]",
      "phone": "000000000",
      "signUrl": "https://xxxx-yyyy-zzzz"
    }
  ]
}
Post Signature Webhooks in Digio API
Reach out to Knit to get your webhook URLBefore getting started with redirects and webhooks, please reach out to us at [email protected] to get your webhook URL that you can set in the Digio dashboard.
Webhook Flow
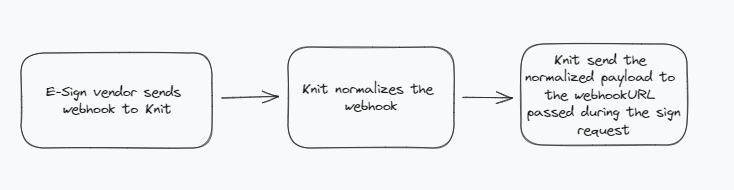
Knit will send the normalized webhook payload to the webhookURL that was passed in the body parameter during the corresponding send document API request.
Digio only sends a webhook on the completion of an agreementDigio sends a webhook only when the agreement has been acted upon by all the signers.
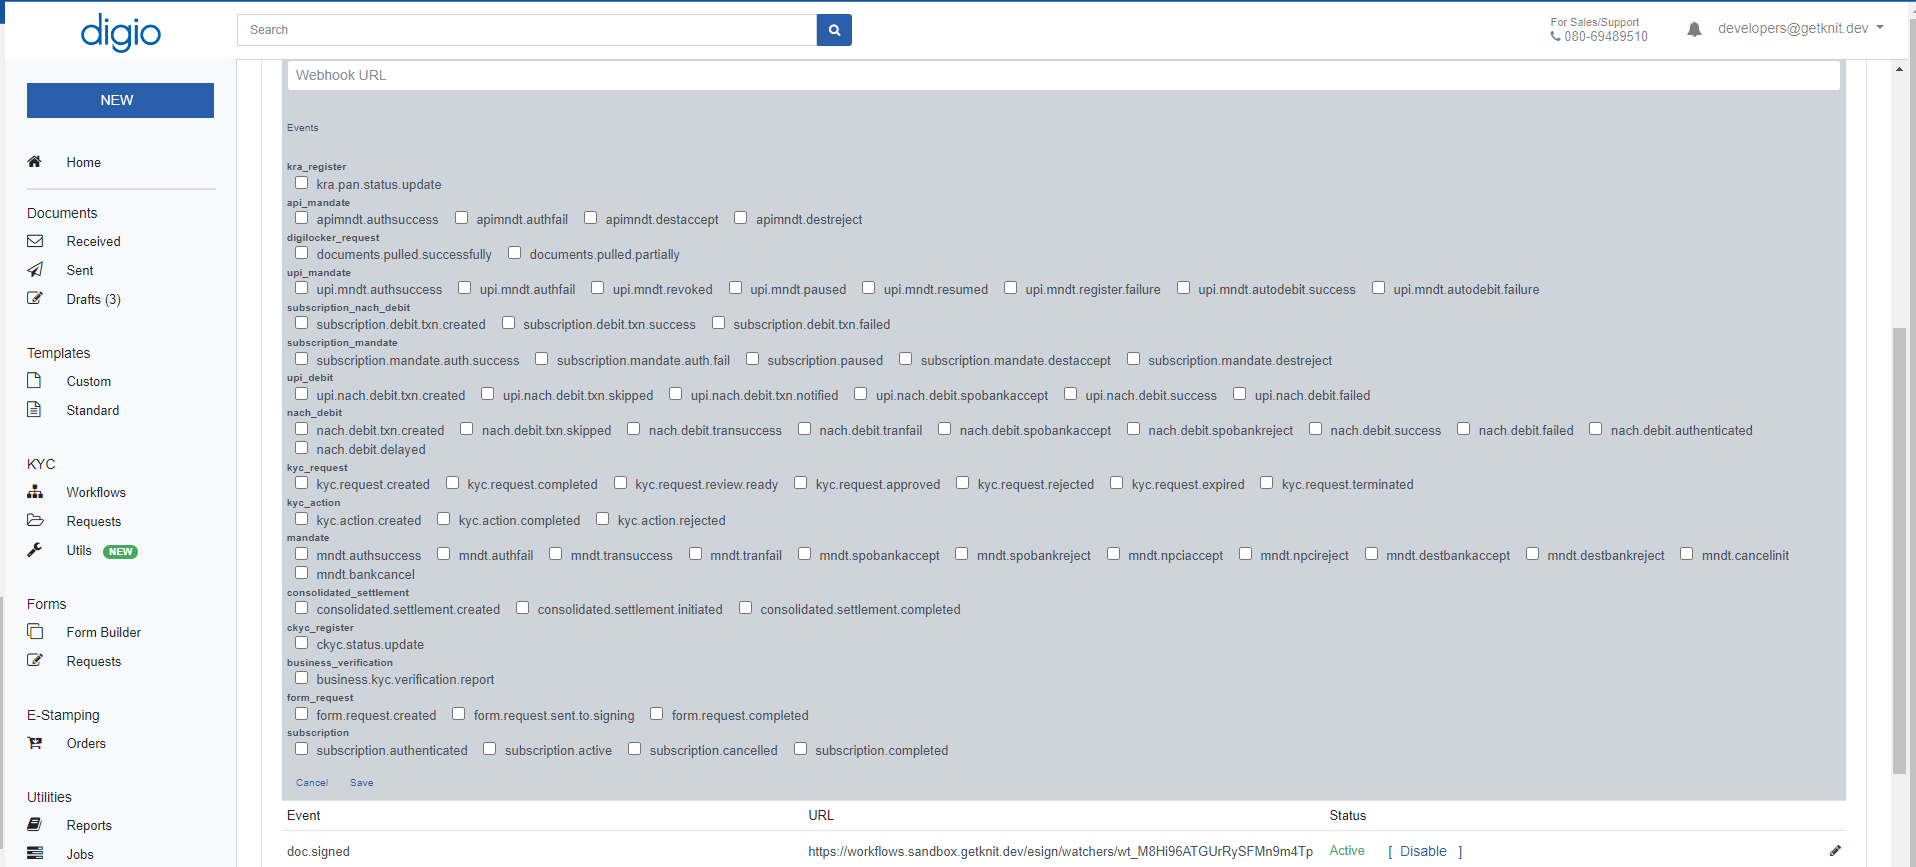
Setting Webhook URL in Digio Dashboard
- Navigate to the profile section using your org account credentials.
- Then click on the account username in the top-right.
- Click on profile from the drop down list.
- Then click on webhooks. Click on manage.
- Enter URL in webhook URL
- Check the check box for the doc.signed event.
- After the above steps click on save.
Webhook Payload
The normalized webhook payload would look something like this:
{
  "eventId": "ev_0XmmeWrgmTXH4awa4IQwEl",
  "eventData": {
    "signers": [
      {
        "name": "Signer1",
        "emailId": "[email protected]",
        "phone": null,
        "status": "SIGNED"
      }
    ],
    "documentSignId": "DID231221231302509GFLA6H44OHRMEQ",
    "document": "base64 string",
    "referenceNum": "OL0001",
    "documentName": "Offer Letter.pdf",
    "documentStatus": "COMPLETED",
    "signedAt": "2023-12-21T17:43:02Z"
  },
  "eventType": "esign.document.webhook"
}
and it would contain the following headers:
| Header | Notes |
|---|---|
X-Knit-Signature | Can be used to authenticate the webhook. Please refer to this link to read more about authenticating webhooks |
X-Knit-Execution-Id | Is a unique id that can be used for debugging purposes |
X-Knit-Integration-Id | The integration-id of the integrated account. You can use this header to identify the account to which the webhook payload belongs |