

Additional SOAP Setup (Along with REST)
This setup is primarly for enabling soap based apis along with standard rest APIs.
Step1: Enable Features
To use Netsuite connector, the REST Web Services feature and OAuth 2.0 must be enabled in your account.
- Go to Setup > Company > Enable Features
- Check the boxes for Client SuiteScript and Server SuiteScript in the SuiteScript section.

- Check the box for REST WEB SERVICES and SOAP WEB SERVICES in SuiteTalk (Web Services) section.

- In the Manage Authentication section, check the OAuth 2.0 box.
- Click Save.
Step2: Create Integration Record
- Go to Setup > Integration > New
- Enter a name for your application in the Name field.
- Enter a description in the Description field, if preferred.
- Select Enabled in the State field.
- Enter a note in the Note field, if preferred.
- On the Authentication tab, perform following steps:
-
Check the box for Token-based Authentication and REST Web Services.
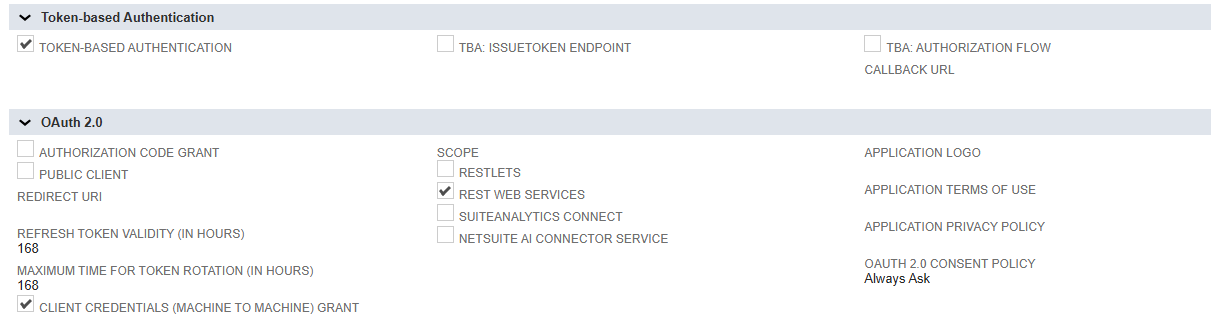
-
Click Save.
-
- You will get Client ID and Client Secret after performing above steps. Check below picture for reference. Keep this clientId and clientSecret as it will be needed in later steps.

Step 3: Create a User Access Token
-
Go to Setup > Users/Roles > Access Tokens > New
-
Select the application, that you have created in Step 2, in Application Name field.
-
Select a user, of this access token, in User field.
-
Set the Role as Employee Center.
-
Click Save.
-
You will get Token Id and Token Secret after performing above steps. Check below picture for reference. Keep this tokenId and tokenSecret as it will be needed in later steps.

Step 4: OAuth 2.0 Client Credentials Setup
- An administrator or a user assigned a role with the OAuth 2.0 Authorized Applications Management permission can create or revoke a mapping for the OAuth 2.0 client credentials flow.
- Navigate to Setup > Integration > Manage Authentication > OAuth 2.0 Client Credentials (M2M) Setup.
- To create a new mapping, click the Create New button.
- In the popup window:
- Select the entity.
- Set the Role as Administrator.
- Choose the Application (which you created in Step 2) to be mapped.
- Upload the public part of the certificate from your computer, which you downloaded from the Knit UI popup.
- Once the certificate is created, copy the Certificate ID and provide it to Knit during integration.
Updated 11 months ago
Did this page help you?